Creating a Split Shipment (ACE Manifest): Difference between revisions
No edit summary Tag: Reverted |
No edit summary |
||
| (27 intermediate revisions by the same user not shown) | |||
| Line 1: | Line 1: | ||
{{note|This article is part of the [[ACE_Manifest_Software_User_Guide_(CBP)|BorderConnect ACE Manifest Guide]]|info}} | |||
<div class="bc-wrap"> | <div class="bc-wrap"> | ||
<div class="bc-hero"> | <div class="bc-article-hero"> | ||
<h1>Split Shipments in ACE</h1> | <h1>Split Shipments in ACE</h1> | ||
<p> | <p>A comprehensive guide to managing shipments that cross the border in multiple loads under a single Shipment Control Number (SCN).</p> | ||
<div class="bc-article-meta"> | |||
<div class="bc- | <span class="bc-article-pill"><i class="fas fa-chart-line"></i> Difficulty: Intermediate</span> | ||
<span class="bc-article-pill"><i class="far fa-clock"></i> Time: 10 Minutes</span> | |||
<span class="bc- | |||
</div> | </div> | ||
</div> | </div> | ||
<div class="bc- | <div class="bc-card"> | ||
<div class="bc- | <div class="bc-float-video"> | ||
<div class="bc-video-trigger" data-video-id="ao9MC-VFGQw"> | |||
<div class=" | <div class="bc-play-icon"><i class="fas fa-play-circle"></i></div> | ||
</div> | |||
<div class="bc- | |||
</div> | |||
</div> | </div> | ||
< | <h2 style="margin-top: 0;">Overview</h2> | ||
<p>A <strong>Split Shipment</strong> occurs when a single PAPS entry is transported across the border in multiple loads due to size or operational needs.</p> | |||
<p>A <strong>Split Shipment</strong> occurs when a single PAPS entry | |||
<div class="bc-did-you-know"> | <p>Because the shipment is split, it requires careful coordination to ensure all loads link back to the same Master shipment record in CBP's system.</p> | ||
<div class="bc-did-you-know" style="margin-top: 25px;"> | |||
<h3>Important Rule</h3> | <h3>Important Rule</h3> | ||
Split shipments must be arranged by the importer | Split shipments must be arranged by the importer/broker <strong>before</strong> the carrier moves the loads. CBP approval is required. | ||
</div> | </div> | ||
< | |||
<div style="clear: both;"></div> </div> | |||
<div class="bc-warning" style="margin-top: 30px;"> | |||
<h3>⚙️ Enable Split Shipments (One-Time Setup)</h3> | |||
Before starting, ensure this is enabled in your account: | |||
<div class="bc-cleanlist"> | <div class="bc-cleanlist"> | ||
* <strong> | * Go to <strong>Account → Company Settings</strong>. | ||
* Under <strong>ACE Shipment Settings</strong>, set <strong>Allow ACE "Split Shipments"</strong> to <strong>Yes</strong>. | |||
* Click <strong>Save</strong>. | |||
</div> | </div> | ||
[[File:Allow-split-shipments.png|800px|class=bc-screenshot|link=]] | |||
</div> | </div> | ||
< | <h2 style="margin-top: 40px; border-bottom: 2px solid #eee; padding-bottom: 10px;">Phase 1: The Master Shipment</h2> | ||
<p>The Master Shipment holds the <strong>total quantity</strong> for all loads combined. It is created first and sent to CBP as an "Unassociated" shipment.</p> | |||
<p> | |||
<div class="bc-card | <div class="bc-card"> | ||
< | <h3><span class="bc-step-circle">1</span> Create the Shipment</h3> | ||
<div class="bc-cleanlist"> | <div class="bc-cleanlist"> | ||
* Navigate to <strong>ACE eManifests | * Navigate to <strong>ACE eManifests → Start New ACE Shipment</strong>. | ||
* Enter the <strong>SCN (PAPS)</strong>, Shipper, Consignee, and Commodity. | * Enter the <strong>SCN (PAPS)</strong>, Shipper, Consignee, and Commodity. | ||
* <strong>Crucial:</strong> Enter the | * <strong>Crucial:</strong> Enter the Total Quantity for <strong>all loads combined</strong>. | ||
* Click <strong>Save</strong>. | * Click <strong>Save</strong>. | ||
</div> | </div> | ||
< | [[File:Start-ace-shipment.png|800px|class=bc-screenshot|link=]] | ||
< | |||
< | <h3><span class="bc-step-circle">2</span> Send to CBP</h3> | ||
<div class="bc-cleanlist"> | <div class="bc-cleanlist"> | ||
* On the Shipment Details page, hover over <strong>Shipment Only Send to CBP</strong>. | * On the Shipment Details page, hover over the menu <strong>Shipment Only Send to CBP</strong>. | ||
* Select <strong>Send Unassociated Shipment</strong>. | * Select <strong>Send Unassociated Shipment</strong>. | ||
* Wait for the status to change to <strong>Accepted</strong>. | * Wait for the status to change to <strong>Accepted</strong>. | ||
</div> | </div> | ||
[[File:Send-unassociated-shipment.png|800px|class=bc-screenshot|link=]] | |||
</div> | </div> | ||
< | <h2 style="margin-top: 40px; border-bottom: 2px solid #eee; padding-bottom: 10px;">Phase 2: The Split Segments</h2> | ||
<p>Once the Master is accepted, create a separate manifest for every physical truckload.</p> | |||
<p | |||
<div class="bc- | <div class="bc-card"> | ||
< | <h3><span class="bc-step-circle">1</span> Link the Segment</h3> | ||
< | |||
<div class="bc-cleanlist"> | <div class="bc-cleanlist"> | ||
* | * Start a <strong>New ACE eManifest</strong> and enter Trip/Driver info. | ||
* Click <strong>Save and Start New ACE Shipment</strong>. | * Click <strong>Save and Start New ACE Shipment</strong>. | ||
* Enter the <strong>Same SCN</strong> used for the Master. | * Enter the <strong>Same SCN</strong> used for the Master. | ||
* Check the box: ☑ <strong>Split Shipment Segment</strong>. | * Check the box: ☑ <strong>Split Shipment Segment</strong>. | ||
* Enter the quantity for <strong>this specific load only</strong>. | * Enter the quantity for <strong>this specific load only</strong>. | ||
</div> | </div> | ||
[[File:Split-segment.png|800px|class=bc-screenshot|link=]] | |||
<div class="bc-pro-tip"> | |||
<strong>Final Step:</strong> Click <strong>Save</strong> (commodity info will auto-fill), then click <strong>Sync with CBP</strong>. Repeat this for every load until the total quantity reaches zero. | |||
</div> | </div> | ||
</div> | </div> | ||
<div class="bc- | <div class="bc-card" style="margin-top: 30px;"> | ||
< | <h3>Visual Workflow</h3> | ||
[[File:Split-shipment-diagram.png|800px|class=bc-screenshot|link=]] | |||
</div> | </div> | ||
<div class="bc-card"> | <div class="bc-card" style="margin-top: 30px;"> | ||
< | <h3>Quick Reference</h3> | ||
{| class="wikitable" style="width:100%; | {| class="wikitable" style="width:100%; margin-bottom:0;" | ||
! Feature | ! Feature | ||
! Master Shipment | ! Master Shipment | ||
! Split | ! Split Segment | ||
|- | |- | ||
| <strong>Sequence</strong> | | <strong>Sequence</strong> | ||
| Line 115: | Line 100: | ||
|- | |- | ||
| <strong>Manifest Status</strong> | | <strong>Manifest Status</strong> | ||
| Unassociated ( | | Unassociated (Standalone) | ||
| Attached to eManifest | | Attached to eManifest | ||
|- | |- | ||
| <strong>Quantity</strong> | | <strong>Quantity</strong> | ||
| Total | | Total (All Loads) | ||
| | | Partial (Truck Load) | ||
|} | |} | ||
</div> | </div> | ||
Latest revision as of 17:30, 4 February 2026
|
🔖 This article is part of the BorderConnect ACE Manifest Guide |
Split Shipments in ACE
A comprehensive guide to managing shipments that cross the border in multiple loads under a single Shipment Control Number (SCN).
Overview
A Split Shipment occurs when a single PAPS entry is transported across the border in multiple loads due to size or operational needs.
Because the shipment is split, it requires careful coordination to ensure all loads link back to the same Master shipment record in CBP's system.
Important Rule
Split shipments must be arranged by the importer/broker before the carrier moves the loads. CBP approval is required.
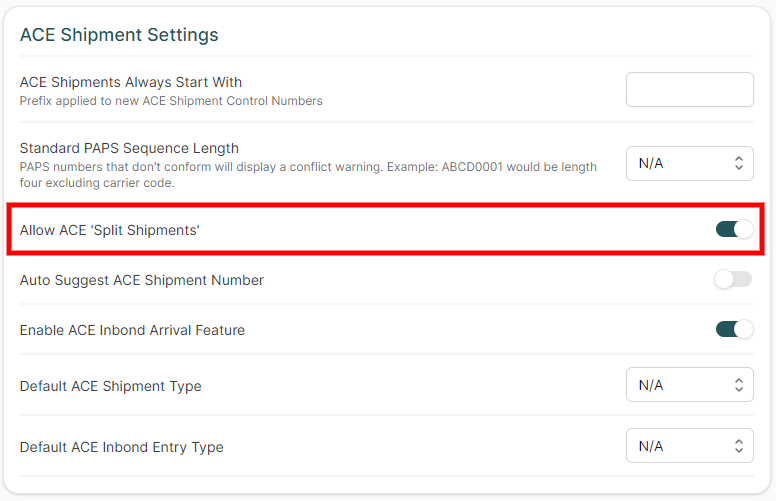
⚙️ Enable Split Shipments (One-Time Setup)
Before starting, ensure this is enabled in your account:
- Go to Account → Company Settings.
- Under ACE Shipment Settings, set Allow ACE "Split Shipments" to Yes.
- Click Save.
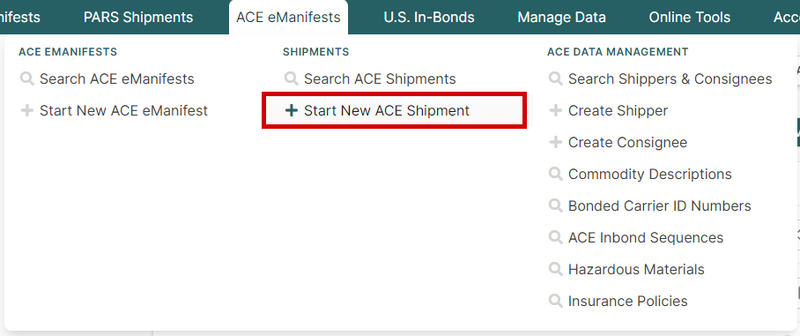
Phase 1: The Master Shipment
The Master Shipment holds the total quantity for all loads combined. It is created first and sent to CBP as an "Unassociated" shipment.
1 Create the Shipment
- Navigate to ACE eManifests → Start New ACE Shipment.
- Enter the SCN (PAPS), Shipper, Consignee, and Commodity.
- Crucial: Enter the Total Quantity for all loads combined.
- Click Save.
2 Send to CBP
- On the Shipment Details page, hover over the menu Shipment Only Send to CBP.
- Select Send Unassociated Shipment.
- Wait for the status to change to Accepted.

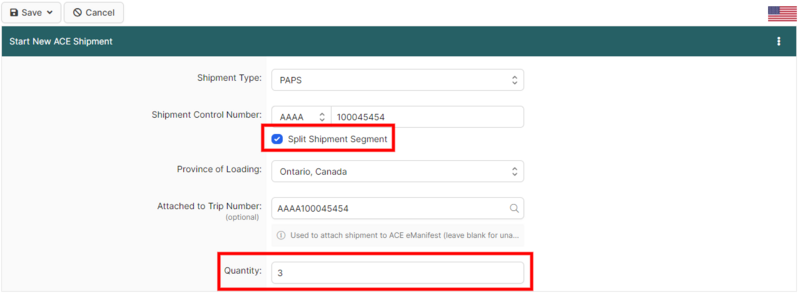
Phase 2: The Split Segments
Once the Master is accepted, create a separate manifest for every physical truckload.
1 Link the Segment
- Start a New ACE eManifest and enter Trip/Driver info.
- Click Save and Start New ACE Shipment.
- Enter the Same SCN used for the Master.
- Check the box: ☑ Split Shipment Segment.
- Enter the quantity for this specific load only.
Final Step: Click Save (commodity info will auto-fill), then click Sync with CBP. Repeat this for every load until the total quantity reaches zero.
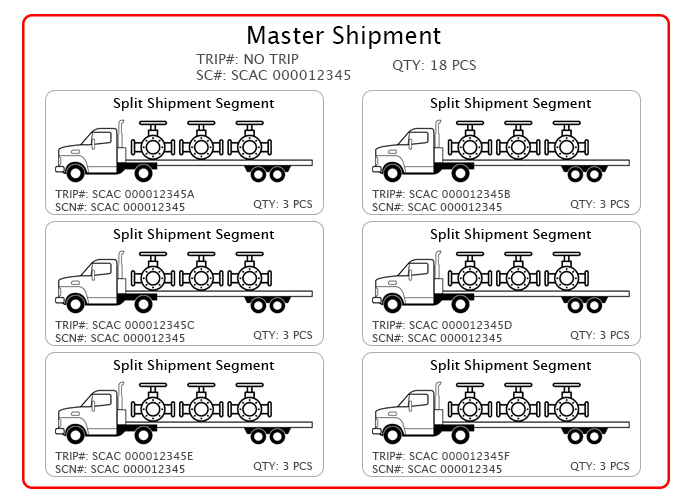
Visual Workflow
Quick Reference
| Feature | Master Shipment | Split Segment |
|---|---|---|
| Sequence | Created First | Created Second |
| Manifest Status | Unassociated (Standalone) | Attached to eManifest |
| Quantity | Total (All Loads) | Partial (Truck Load) |