ACE Shipment CSV Upload Feature (ACE Manifest): Difference between revisions
Created page with "{{#ev:youtube|bWwYYqaVZ0k|960|center|How to import shipments into an ACE eManifest.}} This guide provides '''instructions on how to upload a large volume of shipments into an ACE Manifest''', using BorderConnect's CSV upload feature in an [https://www.borderconnect.com/ace-e-manifest/index.htm ACE Manifest]. The CSV upload feature is designed for users who have a significant amount of shipments on a single trip and would like to avoid entering data separately for each s..." |
No edit summary |
||
| (25 intermediate revisions by the same user not shown) | |||
| Line 1: | Line 1: | ||
{{note|This article is part of the [[ACE_Manifest_Software_User_Guide_(CBP)|BorderConnect ACE Manifest Guide]] and the [[BorderConnect_Software_User_Guide|BorderConnect Software User Guide]]|info}} | |||
{{#ev:youtube|bWwYYqaVZ0k|960|center|How to import shipments into an ACE eManifest.}} | {{#ev:youtube|bWwYYqaVZ0k|960|center|How to import shipments into an ACE eManifest.}} | ||
This guide provides '''instructions on how to upload a large volume of shipments into an ACE Manifest''', using BorderConnect's CSV upload feature in an [https://www.borderconnect.com/ace-e-manifest/index.htm ACE Manifest]. The CSV upload feature is designed for users who have a significant amount of shipments on a single trip and would like to avoid entering data separately for each shipment. | [[File:Company-pref.jpg|thumb|360px|right|Selecting Company Settings from the Account menu]]This guide provides '''instructions on how to upload a large volume of shipments into an ACE Manifest''', using BorderConnect's CSV upload feature in an [https://www.borderconnect.com/ace-e-manifest/index.htm ACE Manifest]. The CSV upload feature is designed for users who have a significant amount of shipments on a single trip and would like to avoid entering data separately for each shipment. | ||
== Enabling Import Buttons == | == Enabling Import Buttons == | ||
The first step is to enable the ability to upload shipments. By default, companies will have this option disabled. To enable this option, once logged into BorderConnect, navigate to the top right corner and hover over the menu option '''Account''', and select '''Company Settings'''. | The first step is to enable the ability to upload shipments. By default, companies will have this option disabled. To enable this option, once logged into BorderConnect, navigate to the top right corner and hover over the menu option '''Account''', and select '''Company Settings'''. | ||
Within the '''Company Settings''' page navigate down to '''Display ACE Import Buttons''' under the section '''eManifest Preferences'''. Once the option is selected to 'Yes', click 'Save' on the top left and your company has now enabled the ability to upload shipments. | Within the '''Company Settings''' page navigate down to '''Display ACE Import Buttons''' under the section '''eManifest Preferences'''. Once the option is selected to 'Yes', click 'Save' on the top left and your company has now enabled the ability to upload shipments. | ||
== CSV File Format == | == CSV File Format == | ||
Before uploading your .csv file, you will need to download the .csv template file that [https://www.borderconnect.com/dist/ace-shipment-csv-template.csv BorderConnect provides here]. The headers in this file must remain intact and un-modified as they are required for the upload to be successful. | [[File:Display-ace-import.png|360px|thumb|right|Enabling ACE import buttons from Company Settings]]Before uploading your .csv file, you will need to download the .csv template file that [https://www.borderconnect.com/dist/ace-shipment-csv-template.csv BorderConnect provides here]. The headers in this file must remain intact and un-modified as they are required for the upload to be successful. | ||
When saving your file, you will need to make sure that it is saved in CSV format, even if you are using a spreadsheet program to edit the file. Only CSV file format can be used for this feature. | When saving your file, you will need to make sure that it is saved in CSV format, even if you are using a spreadsheet program to edit the file. Only CSV file format can be used for this feature. | ||
| Line 36: | Line 33: | ||
*Only the coded values listed in the table below can be used in this field. | *Only the coded values listed in the table below can be used in this field. | ||
Below are the valid Shipment Type values | Below are the valid Shipment Type values.<br> | ||
(Please note that the shipment type values are '''case sensitive''', and the upload will fail if it is not entered ''exactly'' as specified below.) | (Please note that the shipment type values are '''case sensitive''', and the upload will fail if it is not entered ''exactly'' as specified below.) | ||
| Line 46: | Line 43: | ||
| PAPS | | PAPS | ||
| PAPS | | PAPS | ||
|- | |- | ||
| QP In-Bond | | QP In-Bond | ||
| Line 142: | Line 133: | ||
*The value of the commodity, in U.S. Dollars. | *The value of the commodity, in U.S. Dollars. | ||
*'''Numeric only''', with one decimal allowed. Must not include dollar sign, commas, etc. | *'''Numeric only''', with one decimal allowed. Must not include dollar sign, commas, etc. | ||
*System will round to nearest whole number, or up to 1 if less than 1 before transmitting to customs. | *System will round to nearest whole number, or up to 1 if less than 1 before transmitting to customs. | ||
| Line 297: | Line 286: | ||
<u>Country of Origin</u>: | <u>Country of Origin</u>: | ||
*The country in which the commodity was manufactured, grown or otherwise produced. | *The country in which the commodity was manufactured, grown or otherwise produced. | ||
*Must use the 2 letter country code for the country, in upper case letters. | *Must use the 2 letter country code for the country, in upper case letters. | ||
*The full list of acceptable country codes can be [https://www.borderconnect.com/data/countries.json downloaded here]. | *The full list of acceptable country codes can be [https://www.borderconnect.com/data/countries.json downloaded here]. | ||
| Line 303: | Line 291: | ||
== Importing Shipments == | == Importing Shipments == | ||
Once you have the CSV file populated with data in the correct format and your company has enabled the ACE shipment import buttons, you can then import the shipments. | Once you have the CSV file populated with data in the correct format and your company has enabled the ACE shipment import buttons, you can then import the shipments. | ||
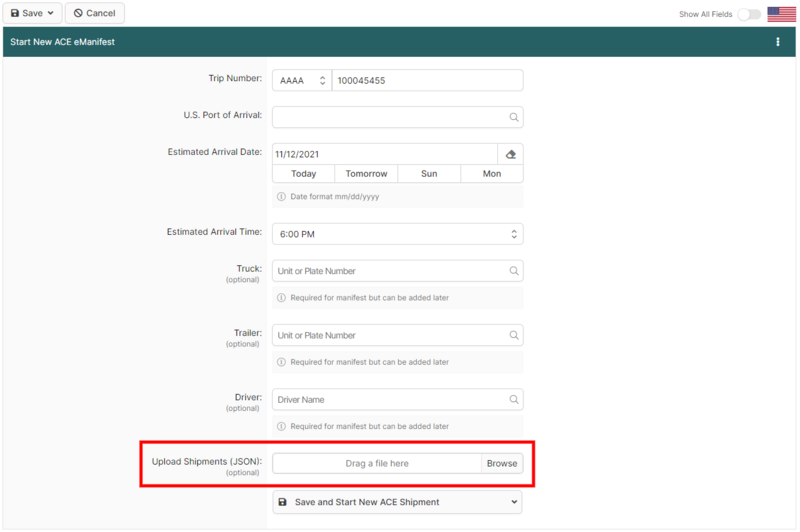
To import the CSV file you must first start a new ACE Manifest or edit an existing ACE Manifest. Then, click the button "Choose File" to navigate locally and select the .csv file you would like to upload. Once the file is selected, click 'Save' on the top left. You will be brought to the ACE Manifest details page where a notice will let you know if the upload was successful, and/or if any errors in the import were found. | |||
Next to the import button you will see that this button is for JSON files, but CSV files will also be accepted. | Next to the import button you will see that this button is for JSON files, but CSV files will also be accepted. | ||
[[File:Ace-upload-shipments.png|800px]] | |||
== Importing 10,000 Or More Shipments To a Single ACE Manifest == | |||
{{#ev:youtube|LfbA8W-R9S0|360|right|Importing 10,000 or more shipments into an ACE Manifest}}By default users can only upload 9999 shipments into a single ACE Manifest, which is enough for most users who wish to import shipments into an ACE for example. However, in some cases more shipments will need to be added to a single ACE Manifest. | |||
Importing 10,000 or more shipments into a single ACE Manifest involves creating multiple ACE Manifests and importing no more than 9999 shipments into each separate ACE Manifest, then moving the imported shipments from the second (or third) ACE manifest, back to the original manifest using the Link Shipments to Trip feature. | |||
'''How to Import More than 10,000 Shipments to a Single ACE''' | |||
*1. Create your first ACE eManifest, so in the drop down menu select ACE eManifests and select Start New ACE Manifest, and after you enter all your trip details, at the bottom you have the option to upload shipments directly into your ACE Manifest in either a JSON or CSV file format. Now click and locate or drag the file into the manifest. Then on the top left, hover over Save and then select Save and View Trip Details. If you’re adding a significant amount of shipments it may take some time to process the shipment upload so it’s important to be patient during this process. Once this process is complete, you’ll be brought to the ACE Manifest Details page where you can see that your shipments have been successfully imported into the ACE Manifest. | |||
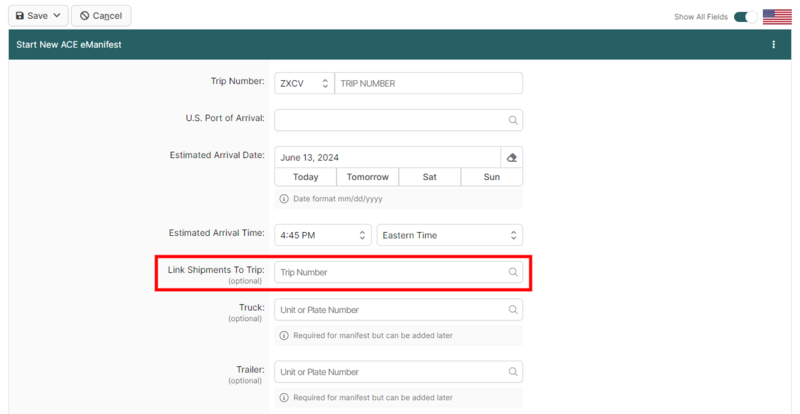
*2. Create a new ACE Manifest, so at the top under ACE eManifest select Start New ACE Manifest. For this second trip number you can use the same trip number as previously, only this time adding a B to the end. Next on the top right, ''Show All Fields'' will need to be enabled, which will reveal the field '''Link Shipments to Trip'''. So click into Link Shipments to Trip and assign the original trip that you created initially. This will link all of this trips shipments to that manifest. | |||
[[File:Link-shipments-to-trip-field.png|800px]] | |||
*3. Next enter the remainder of the trip details, and then at the bottom click and locate or drag the second JSON or CSV file that contains the additional shipments into this manifest. Then go to the top left and hover over Save and select Save and View Trip Details. And just like the first large batch of imports, you will need to be patient as these shipments are imported into BorderConnect. Once the import is complete you will be brought to the ACE Manifest Details page. | |||
[[File: | If you had even more shipments to add to the original manifest, just repeat the process for the second manifest that we created, and create your third ACE manifest while adding “C” to the end of the trip number and import the additional shipments on that manifest. | ||
*4. Next Send the first ACE Manifest to CBP, so under ACE Manifests click Search ACE Manifests and then click into or view the original ACE that was created from the ACE Manifest listing page. Once in the ACE Manifest Details page, hover over Send to CBP at the top and click Send Complete Manifest which will move the status to two yellow bars, transmitted. And because this manifest contains a significant amount of shipments, it will take much longer than usual to get processed by CBP and accepted, in some cases up to 20 minutes. But once it does get accepted, it will turn to three blue bars. | |||
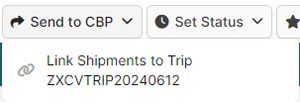
*5. After the first ACE is on file with CBP you will have to send the second manifest that was created, so again, under ACE eManifests click Search ACE Manifests and View the second ACE Manifest that was created. Once in it, hover over Send to CBP and click ''Link Shipments to Trip'' which will transmit your manifest to CBP linking these shipments to the original manifest at the same time. And after some time it will get accepted and move to three blue bars. Now all the shipments have been successfully accepted and linked to the original first manifest that we created. | |||
[[File:Send-link-shipments-to-trip.jpg|300px]] | |||
== Common Import Errors == | == Common Import Errors == | ||
Listed below are some of the common errors users receive when trying to upload their .csv file into BorderConnect. | Listed below are some of the common errors users receive when trying to upload their .csv file into BorderConnect. | ||
'''Shipment Control Number Errors''' | '''Shipment Control Number Errors''' | ||
| Line 457: | Line 469: | ||
[[Category:ACE Manifest Guide]] | [[Category:ACE Manifest Guide]] | ||
[[Category:BorderConnect Software User Guide]] | |||
Latest revision as of 12:30, 4 September 2025
|
🔖 This article is part of the BorderConnect ACE Manifest Guide and the BorderConnect Software User Guide |
This guide provides instructions on how to upload a large volume of shipments into an ACE Manifest, using BorderConnect's CSV upload feature in an ACE Manifest. The CSV upload feature is designed for users who have a significant amount of shipments on a single trip and would like to avoid entering data separately for each shipment.
Enabling Import Buttons
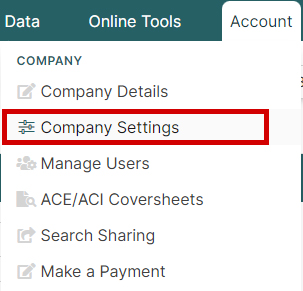
The first step is to enable the ability to upload shipments. By default, companies will have this option disabled. To enable this option, once logged into BorderConnect, navigate to the top right corner and hover over the menu option Account, and select Company Settings.
Within the Company Settings page navigate down to Display ACE Import Buttons under the section eManifest Preferences. Once the option is selected to 'Yes', click 'Save' on the top left and your company has now enabled the ability to upload shipments.
CSV File Format
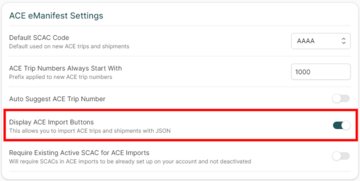
Before uploading your .csv file, you will need to download the .csv template file that BorderConnect provides here. The headers in this file must remain intact and un-modified as they are required for the upload to be successful.
When saving your file, you will need to make sure that it is saved in CSV format, even if you are using a spreadsheet program to edit the file. Only CSV file format can be used for this feature.
Field Specifications
SCN (Shipment Control Number)
- Unique identifier assigned to this shipment by the carrier.
- Starts with carrier's 4 letter SCAC code followed by unique reference number.
- Must be alpha-numeric with no spaces or special characters, letters must be upper case.
- Minimum length: 8 characters.
- Maximum length: 16 characters.
When entering Shipments Control Numbers into the CSV document, you can enter them manually OR you have the option to use BorderConnect's system to automatically generate SCNs. To import shipments with automatically generated shipment control numbers in sequential order enter your SCAC + the word AUTOFILL (ex. ZZZZAUTOFILL). Using the autofill feature means that all SCNs must use the autofill feature. You cannot have a mix of autofill and non-autofill SCNs.
Shipment Type
- The type of U.S. Customs clearance for this shipment.
- Only the coded values listed in the table below can be used in this field.
Below are the valid Shipment Type values.
(Please note that the shipment type values are case sensitive, and the upload will fail if it is not entered exactly as specified below.)
| Shipment Type | Value |
|---|---|
| PAPS | PAPS |
| QP In-Bond | QP_IN_BOND |
| Intangibles | INTANGIBLES |
| Free of Duty (Customs Form 7523) | ATTACHED_CF7523 |
| Returned American Products (Customs Form 3311) | ATTACHED_CF3311 |
| Personal Shipment (Customs Form 3299) | ATTACHED_CF3299 |
Province Of Loading
- The Canadian Province or Mexican State in which the shipment was picked up by the carrier.
- Must use the 2 letter code of the Canadian province or 3 letter code of the Mexican state.
E.g. For a shipment loading in British Columbia, you must use BC. For a shipment loading in Guerrero, you must use GRO. State or province codes must be upper case.
Shipper
Name:
- The name of the shipper for this shipment.
- Minimum length: 1
- Maximum length: 60
Address:
- The street number and street name of the shipper for this shipment.
- Minimum length: 1
- Maximum length: 55
City:
- The city name of the shipper for this shipment.
- Minimum length: 1
- Maximum length: 30
State:
- The Canadian Province or Mexican State of the shipper for this shipment.
- Must use the 2 letter code of the Canadian province or 3 letter code of the Mexican state.
- State or province codes must be upper case.
Zip:
- The postal code of the shipper for this shipment.
- For Canadian postal codes, must be in the format "A1A1A1" or "A1A 1A1".
- For Mexican postal codes, must be in the format "12345".
- Letters must be upper case.
Consignee
Name:
- The name of the consignee for this shipment.
- Minimum length: 1
- Maximum length: 60
Address:
- The street number and street name of the consignee for this shipment.
- Minimum length: 1
- Maximum length: 55
City:
- The city name of the consignee for this shipment.
- Minimum length: 1
- Maximum length: 30
State:
- The American State of the consignee for this shipment.
- Must use the 2 letter code of the American state code.
- State codes must be upper case.
Zip:
- The zip code of the consignee for this shipment.
- Must be in the format "12345" or "12345-6789"
Commodity
Description:
- A description of the goods in this shipment.
- Should use plain language and be sufficient to give officer good idea of what is being shipped.
- Generic descriptions such as "freight of all kinds" are not allowed by customs.
- Minimum length: 1
- Maximum length: 45
Value:
- The value of the commodity, in U.S. Dollars.
- Numeric only, with one decimal allowed. Must not include dollar sign, commas, etc.
- System will round to nearest whole number, or up to 1 if less than 1 before transmitting to customs.
Quantity:
- The quantity of the lowest external packaging unit. (e.g. if shipments consists of 100 pieces packaged in 5 boxes sitting on 1 skid, the quantity should be entered as 5, because boxes are the lowest external packaging unit.)
- Numeric only, with no spaces or special characters. Decimal values not allowed.
Quantity Unit:
- The type of packaging for the commodity.
- Must use a 3 letter Package Type code from the table provided.
Below are the valid package types for the commodity. E.g. for Cartons, CTN must be entered.
(Please note that the package type values are case sensitive, and the upload will fail if it is not entered exactly as specified below.)
| Package Type | Value | Package Type | Value | Package Type | Value | Package Type | Value |
|---|---|---|---|---|---|---|---|
| Bag | BAG | Carton | CTN | Heads of Beef | HED | Roll | ROL |
| Bale | BLE | Case | CAS | Keg | KEG | Sack | SAK |
| Barrel | BBL | Cask | CSK | Lift Van | LVN | Sheet | SHT |
| Basket | BSK | Chest | CHS | Liquid Bulk | LBK | Sides of Beef | SID |
| Bin | BIN | Coil | COL | Logs | LOG | Skid | SKD |
| Bing Chest | BIC | Container Bulk Cargo | CBC | Lugs | LUG | Tank | TNK |
| Box | BOX | Cord | COR | Package | PKG | Tin | TIN |
| Bucket | BKT | Crate | CRT | Pail | PAL | Tote Bin | TBN |
| Bundle | BDL | Cylinder | CYL | Parcel | PCL | Tube | TBE |
| Can | CAN | Drum | DRM | Pieces | PCS | Unit | UNT |
| Can Case | CCS | Dry Bulk | DBK | Private Vehicle | POV | Van Pack | VPK |
| Carboy | CBY | Gallon | GAL | Quarters of Beef | QTR | Vehicle | VEH |
| Carcass | CAR | Hamper | HMP | Reel | REL | Wooden Case | WDC |
Weight:
- The gross weight of the commodity.
- Numeric only, with no spaces or special characters. Decimal values not allowed, should be rounded to the nearest whole number.
Weight Unit:
- The weight unit for the commodity.
- For Pounds, acceptable values are: "L", "LB", "LBS", "LBR"
- For Kilograms, acceptable values are: "K", "KG", "KGM"
Country of Origin:
- The country in which the commodity was manufactured, grown or otherwise produced.
- Must use the 2 letter country code for the country, in upper case letters.
- The full list of acceptable country codes can be downloaded here.
Importing Shipments
Once you have the CSV file populated with data in the correct format and your company has enabled the ACE shipment import buttons, you can then import the shipments.
To import the CSV file you must first start a new ACE Manifest or edit an existing ACE Manifest. Then, click the button "Choose File" to navigate locally and select the .csv file you would like to upload. Once the file is selected, click 'Save' on the top left. You will be brought to the ACE Manifest details page where a notice will let you know if the upload was successful, and/or if any errors in the import were found.
Next to the import button you will see that this button is for JSON files, but CSV files will also be accepted.
Importing 10,000 Or More Shipments To a Single ACE Manifest
By default users can only upload 9999 shipments into a single ACE Manifest, which is enough for most users who wish to import shipments into an ACE for example. However, in some cases more shipments will need to be added to a single ACE Manifest.
Importing 10,000 or more shipments into a single ACE Manifest involves creating multiple ACE Manifests and importing no more than 9999 shipments into each separate ACE Manifest, then moving the imported shipments from the second (or third) ACE manifest, back to the original manifest using the Link Shipments to Trip feature.
How to Import More than 10,000 Shipments to a Single ACE
- 1. Create your first ACE eManifest, so in the drop down menu select ACE eManifests and select Start New ACE Manifest, and after you enter all your trip details, at the bottom you have the option to upload shipments directly into your ACE Manifest in either a JSON or CSV file format. Now click and locate or drag the file into the manifest. Then on the top left, hover over Save and then select Save and View Trip Details. If you’re adding a significant amount of shipments it may take some time to process the shipment upload so it’s important to be patient during this process. Once this process is complete, you’ll be brought to the ACE Manifest Details page where you can see that your shipments have been successfully imported into the ACE Manifest.
- 2. Create a new ACE Manifest, so at the top under ACE eManifest select Start New ACE Manifest. For this second trip number you can use the same trip number as previously, only this time adding a B to the end. Next on the top right, Show All Fields will need to be enabled, which will reveal the field Link Shipments to Trip. So click into Link Shipments to Trip and assign the original trip that you created initially. This will link all of this trips shipments to that manifest.
- 3. Next enter the remainder of the trip details, and then at the bottom click and locate or drag the second JSON or CSV file that contains the additional shipments into this manifest. Then go to the top left and hover over Save and select Save and View Trip Details. And just like the first large batch of imports, you will need to be patient as these shipments are imported into BorderConnect. Once the import is complete you will be brought to the ACE Manifest Details page.
If you had even more shipments to add to the original manifest, just repeat the process for the second manifest that we created, and create your third ACE manifest while adding “C” to the end of the trip number and import the additional shipments on that manifest.
- 4. Next Send the first ACE Manifest to CBP, so under ACE Manifests click Search ACE Manifests and then click into or view the original ACE that was created from the ACE Manifest listing page. Once in the ACE Manifest Details page, hover over Send to CBP at the top and click Send Complete Manifest which will move the status to two yellow bars, transmitted. And because this manifest contains a significant amount of shipments, it will take much longer than usual to get processed by CBP and accepted, in some cases up to 20 minutes. But once it does get accepted, it will turn to three blue bars.
- 5. After the first ACE is on file with CBP you will have to send the second manifest that was created, so again, under ACE eManifests click Search ACE Manifests and View the second ACE Manifest that was created. Once in it, hover over Send to CBP and click Link Shipments to Trip which will transmit your manifest to CBP linking these shipments to the original manifest at the same time. And after some time it will get accepted and move to three blue bars. Now all the shipments have been successfully accepted and linked to the original first manifest that we created.
Common Import Errors
Listed below are some of the common errors users receive when trying to upload their .csv file into BorderConnect.
Shipment Control Number Errors
Can't perform import since AUTOFILL shipment numbers are combined with explicitly stated shipment control numbers.
Some of the Shipment Control Numbers in your file are using your SCAC plus AUTOFILL, and some are not. To use the Autofill feature, all Shipment Control Numbers must be filled in as SCAC plus AUTOFILL.
It is currently also possible to get this error because there are blank rows at the bottom of your CSV file. You may want to use a plain text editor to check your file for rows consisting of only commas and remove those rows from the file.
SCAC Code [AAA5] is invalid. Must be 4 alphanumeric characters. [AAA5459071]
The SCAC code has an incorrect amount of characters. SCAC should be four letters.
Shipment Control Number is invalid, it must be 8-16 alphanumeric characters with no spaces and letters must be uppercase. [AAAA545907321321321131]
The Shipment Control Number has too many characters. SCN must be between 8-16 characters.
Shipment Type Errors
Shipment Type [SECTION 321] is invalid [AAAA5459071]
The Shipment Type value is incorrect and should be "SECTION_321". Double check acceptable shipment type values and try to upload again.
Shipper Errors
Province of Loading code [BX] unrecognized. [AAAA5459071]
OR
Province of Loading code [British Columbia] unrecognized. [AAAA5459071]
The Province of Loading for the shipper is not recognized. Format must use the acronym "BC". (ex. "ON", "MB", "NS", etc.)
Shipper Name [Demo Business Incorporated CO Steven Stevenson Incorporated of Vancouver bla bla] invalid. Must be between 1 and 60 characters, with no accents or other invalid characters. [AAAA5459091]
The Shipper Name has too many characters. It must be between 1 and 60 characters.
Shipper Canadian Postal Code [VSS 1A1] invalid. [AAAA5459219]
The shipper postal code is invalid. Should be (letter-number-letter number-letter-number)
Consignee Errors
Consignee State [California] is invalid or does not match with country [US]. [AAAA5459219]
The state of the consignee is not recognized. Format must use the acronym "CA". (ex. "NY", "WA", "FL", etc.)
Consignee U.S. Zip Code [4321] invalid. [AAAA5459219]
The consignee address has a zip code that is invalid. Zip codes must be five character numbers or ten character numbers (ex. 45180-6789 and must include the dash if the ten character format is used).
Note: It is common for spreadsheet programs to strip leading zeroes from fields. E.g. zip code beginning with a zero such as 04321 might be saved as 4321 by the spreadsheet program, which would be an unacceptable zip code for upload to BorderConnect.
It may be necessary to look for solutions within the program that you're using to generate the CSV file to remedy this issue. For some spreadsheet programs, saving the number as ="04321" instead of just 04321 works.
Commodity Errors
Unknown packaging unit [box]. [AAAA5459219]
The package type is in the incorrect format. The correct variable for the box package type is "BOX". Remember that values are case-sensitive.
Shipment commodity weight is invalid. It must be numeric [0.63]
Commodity weight must be listed in whole numbers only. Should be rounded to the nearest number, or up to 1 if less than 1.
Commodity weight unit [POUNDS] is invalid. [AAAA5459219]
The unit of measure for the weight is incorrect. It must follow the value guidlines for import. In this case if pounds was the unit of weight, the correct value is "LB", "L", "LBS" or "LBR"

