Creating a Split Shipment (ACE Manifest): Difference between revisions
No edit summary |
No edit summary |
||
| Line 1: | Line 1: | ||
<div class="bc-wrap"> | <div class="bc-wrap"> | ||
<div class="bc-hero"> | <div class="bc-article-hero"> | ||
<h1>Split Shipments in ACE</h1> | <h1>Split Shipments in ACE</h1> | ||
<p> | <p>A comprehensive guide to managing shipments that cross the border in multiple loads under a single Shipment Control Number (SCN).</p> | ||
<div class="bc-article-meta"> | |||
<div class="bc- | <span class="bc-article-pill">Difficulty: Intermediate</span> | ||
<span class="bc-article-pill">Time: 10 Minutes</span> | |||
<span class="bc- | |||
<span class="bc- | |||
</div> | </div> | ||
</div> | </div> | ||
{{note|This article is part of the [[ACE_Manifest_Software_User_Guide_(CBP)|BorderConnect ACE Manifest Guide]]|info}} | |||
<div class="bc-grid"> | |||
<div class="bc-card"> | <div class="bc-card"> | ||
<div class="embedvideo" style="width: 100%; aspect-ratio: 16/9;"> | <div class="embedvideo" style="width: 100%; aspect-ratio: 16/9;"> | ||
{{#ev:youtube|ao9MC-VFGQw|100%|center}} | {{#ev:youtube|ao9MC-VFGQw|100%|center}} | ||
</div> | </div> | ||
</div> | </div> | ||
| Line 25: | Line 21: | ||
<div class="bc-card"> | <div class="bc-card"> | ||
<h2>Overview</h2> | <h2>Overview</h2> | ||
<p>A <strong>Split Shipment</strong> | <p>A <strong>Split Shipment</strong> occurs when a single PAPS entry is transported across the border in multiple loads due to size or operational needs.</p> | ||
<div class="bc-did-you-know"> | <div class="bc-did-you-know" style="margin-top:10px;"> | ||
<h3>Important Rule</h3> | <h3>Important Rule</h3> | ||
Split shipments must be | Split shipments must be arranged by the importer/broker <strong>before</strong> the carrier moves the loads. CBP approval is required. | ||
</div> | </div> | ||
</div> | </div> | ||
</div> | </div> | ||
<div class="bc-warning" style="margin-top: 30px;"> | |||
<h3>⚙️ Enable Split Shipments (One-Time Setup)</h3> | |||
Before starting, ensure this is enabled in your account: | |||
<div class="bc-cleanlist"> | |||
* Go to <strong>Account → Company Settings</strong>. | |||
* Under <strong>ACE Shipment Settings</strong>, set <strong>Allow ACE "Split Shipments"</strong> to <strong>Yes</strong>. | |||
* Click <strong>Save</strong>. | |||
</div> | </div> | ||
[[File:Allow-split-shipments.png|800px|class=bc-screenshot|link=]] | |||
</div> | </div> | ||
< | <h2 style="margin-top: 40px; border-bottom: 2px solid #eee; padding-bottom: 10px;">Phase 1: The Master Shipment</h2> | ||
<p>The Master Shipment holds the <strong>total quantity</strong> for all loads combined. It is created first and sent to CBP as an "Unassociated" shipment.</p> | |||
<p | |||
<div class="bc- | <div class="bc-card"> | ||
< | <h3><span class="bc-step-circle">1</span> Create the Shipment</h3> | ||
< | |||
<div class="bc-cleanlist"> | <div class="bc-cleanlist"> | ||
* | * Navigate to <strong>ACE eManifests → Start New ACE Shipment</strong>. | ||
* Enter the <strong>SCN (PAPS)</strong> | * Enter the <strong>SCN (PAPS)</strong>, Shipper, Consignee, and Commodity. | ||
* | * <strong>Crucial:</strong> Enter the Total Quantity for <strong>all loads combined</strong>. | ||
* Click <strong>Save</strong>. | * Click <strong>Save</strong>. | ||
</div> | </div> | ||
< | [[File:Start-ace-shipment.png|800px|class=bc-screenshot|link=]] | ||
< | |||
< | <h3><span class="bc-step-circle">2</span> Send to CBP</h3> | ||
<div class="bc-cleanlist"> | <div class="bc-cleanlist"> | ||
* On the Shipment Details page, hover over the | * On the Shipment Details page, hover over the menu <strong>Shipment Only Send to CBP</strong>. | ||
* | * Select <strong>Send Unassociated Shipment</strong>. | ||
* Wait for the status to change to <strong>Accepted</strong>. | * Wait for the status to change to <strong>Accepted</strong>. | ||
</div> | </div> | ||
[[File:Send-unassociated-shipment.png|800px|class=bc-screenshot|link=]] | |||
</div> | </div> | ||
< | <h2 style="margin-top: 40px; border-bottom: 2px solid #eee; padding-bottom: 10px;">Phase 2: The Split Segments</h2> | ||
<p>Once the Master is accepted, create a separate manifest for every physical truckload.</p> | |||
<p | |||
<div class="bc- | <div class="bc-card"> | ||
< | <h3><span class="bc-step-circle">1</span> Link the Segment</h3> | ||
< | |||
<div class="bc-cleanlist"> | <div class="bc-cleanlist"> | ||
* Start a <strong>New ACE eManifest</strong> | * Start a <strong>New ACE eManifest</strong> and enter Trip/Driver info. | ||
* Click <strong>Save and Start New ACE Shipment</strong>. | * Click <strong>Save and Start New ACE Shipment</strong>. | ||
* Enter the <strong>Same SCN</strong> used for the Master. | |||
* | |||
* Check the box: ☑ <strong>Split Shipment Segment</strong>. | * Check the box: ☑ <strong>Split Shipment Segment</strong>. | ||
* Enter quantity for <strong>this load only</strong> | * Enter the quantity for <strong>this specific load only</strong>. | ||
</div> | </div> | ||
[[File:Split-segment.png|800px|class=bc-screenshot|link=]] | |||
<div class="bc-pro-tip"> | |||
<strong>Final Step:</strong> Click <strong>Save</strong> (commodity info will auto-fill), then click <strong>Sync with CBP</strong>. Repeat this for every load until the total quantity reaches zero. | |||
</div> | </div> | ||
</div> | </div> | ||
<div class="bc- | <div class="bc-card" style="margin-top: 30px;"> | ||
< | <h3>Visual Workflow</h3> | ||
[[File:Split-shipment-diagram.png|800px|class=bc-screenshot|link=]] | |||
</div> | </div> | ||
<div class="bc-card" style="margin-top: | <div class="bc-card" style="margin-top: 30px;"> | ||
< | <h3>Quick Reference</h3> | ||
{| class="wikitable" style="width:100%; margin-bottom:0;" | {| class="wikitable" style="width:100%; margin-bottom:0;" | ||
! Feature | ! Feature | ||
Revision as of 15:21, 4 February 2026
Split Shipments in ACE
A comprehensive guide to managing shipments that cross the border in multiple loads under a single Shipment Control Number (SCN).
|
🔖 This article is part of the BorderConnect ACE Manifest Guide |
Overview
A Split Shipment occurs when a single PAPS entry is transported across the border in multiple loads due to size or operational needs.
Important Rule
Split shipments must be arranged by the importer/broker before the carrier moves the loads. CBP approval is required.
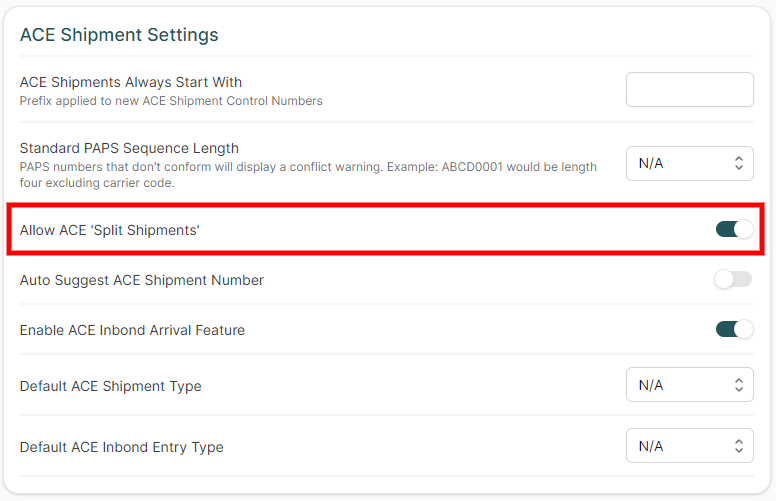
⚙️ Enable Split Shipments (One-Time Setup)
Before starting, ensure this is enabled in your account:
- Go to Account → Company Settings.
- Under ACE Shipment Settings, set Allow ACE "Split Shipments" to Yes.
- Click Save.
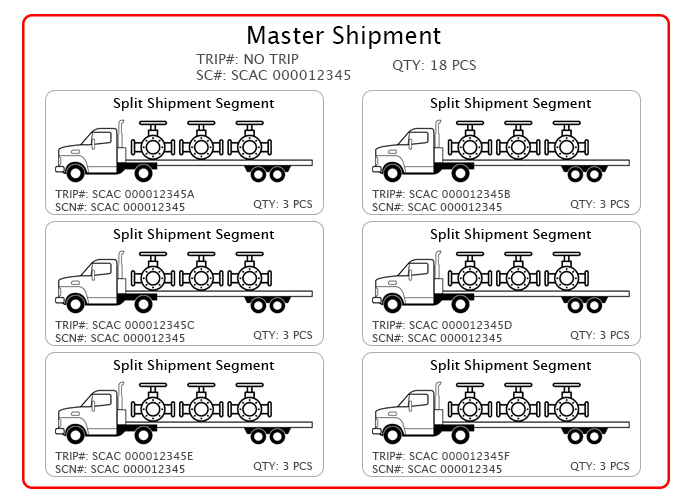
Phase 1: The Master Shipment
The Master Shipment holds the total quantity for all loads combined. It is created first and sent to CBP as an "Unassociated" shipment.
1 Create the Shipment
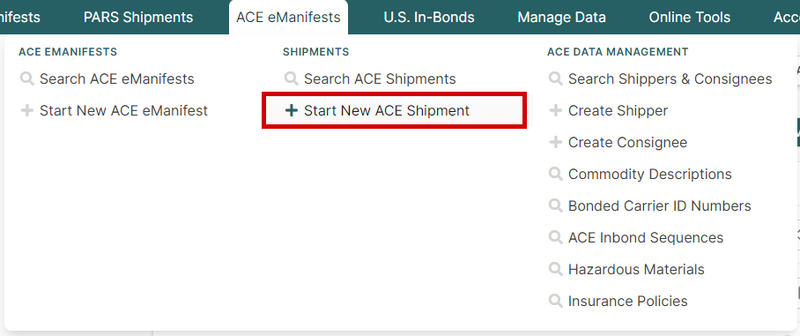
- Navigate to ACE eManifests → Start New ACE Shipment.
- Enter the SCN (PAPS), Shipper, Consignee, and Commodity.
- Crucial: Enter the Total Quantity for all loads combined.
- Click Save.
2 Send to CBP
- On the Shipment Details page, hover over the menu Shipment Only Send to CBP.
- Select Send Unassociated Shipment.
- Wait for the status to change to Accepted.

Phase 2: The Split Segments
Once the Master is accepted, create a separate manifest for every physical truckload.
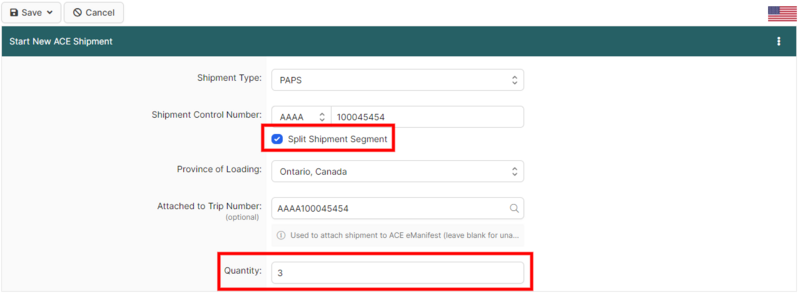
1 Link the Segment
- Start a New ACE eManifest and enter Trip/Driver info.
- Click Save and Start New ACE Shipment.
- Enter the Same SCN used for the Master.
- Check the box: ☑ Split Shipment Segment.
- Enter the quantity for this specific load only.
Final Step: Click Save (commodity info will auto-fill), then click Sync with CBP. Repeat this for every load until the total quantity reaches zero.
Visual Workflow
Quick Reference
| Feature | Master Shipment | Split Segment |
|---|---|---|
| Sequence | Created First | Created Second |
| Manifest Status | Unassociated (Standalone) | Attached to eManifest |
| Quantity | Total (All Loads) | Partial (Truck Load) |