Jump to content

ACI Shipment Details Page (ACI eManifest)

From BorderConnect Wiki
This article is part of the BorderConnect Software User Guide
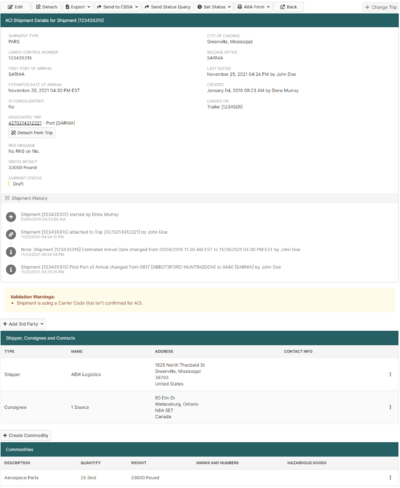
ACI Shipment Details page.

The ACI Shipment Details Page is the main page of an ACI Shipment in BorderConnect ACI eManifest software. It gives a complete overview of all the information for the shipment, as well as the ability to make changes and transmit it to CBSA.

The ACI Shipment Details Page can be accessed in the following ways:

  • This page will come up automatically upon clicking the Save Button on the Start New ACI Shipment Page.
  • By using the 'Back to ACI Shipment' link that is created to allow easy return to the most recently viewed shipment.
  • From the ACI Shipment Search Page by clicking 'View' on the ACI Shipment search result.

Main Function Buttons

The Main Function Buttons are located near the top of the page. They allow the user to alter main information for the shipment.

Edit Button
Brings the user to the Edit ACI Shipment Page. This allows the user to change the Cargo Control Number, Ports of Entry and Release, and the ETA, among other options. Once the changes are made, clicking 'Save' will return the user to the ACI Shipment Details Page.
Detach Button
Used to remove the shipment from the manifest it is attached to. The shipment will remain in BorderConnect as an Unassociated Shipment, which will allow it to be reassigned to a manifest later. This button only appears when the shipment is attached to a manifest.
Export Button
Selecting JSON will download a .json file with all of your shipment data in that format.

ACI Shipment Main Function Buttons

Send to CBSA Button
Used to transmit ACI Shipment data to CBSA. Please note that normally the 'Send to CBSA' on the ACI eManifest Details Page should be used instead as it allows all Trip and Shipment data for the manifest to be sent at once. Moving the mouse over this button displays the following choices:
  • Send New Shipment Request: Transmits the shipment to CBSA. Should only be used when the shipment is not currently on file with CBSA. ie a draft or cancelled shipment.
  • Send Change Shipment Request: Transmits a change request for the shipment to CBSA. Used when the shipment is already on file and needs to be updated, or in correcting a rejected shipment. Can only be used prior to manifest being arrived by CBSA. after that, an amend is required instead.
  • Send Amendment to Shipment Request: Transmits an amend request for the shipment to CBSA. Used when the shipment is on an arrived manifest and needs to be updated. Can only be used once the manifest is arrived by CBSA. Before that, a change request is required instead. All amendment requests will the require the user to specify the reason for the amendment.
  • Send Cancel/Delete Request: Transmits a request to cancel the shipment to CBSA. Used the shipment is already on file and needs to be cancelled in order to allow changes to the cargo control number, or simply because the freight is no longer expected to cross the border. Please note that if the shipment is attached to a manifest that is also is on file with CBSA it will not be possible to cancel the shipment only, a cancel will need to be sent for the manifest as well.
Once the selection is made the user will be asked to confirm the transmission, and the request will be sent to CBSA. If there were any errors on the manifest to prevent the transmission, the user would be notified at this time.
Set Status Button
Used to correct the Current Status of the shipment when it is believed to be incorrect. Because the system updates the Current Status automatically based on CBSA responses, this feature should seldom if ever be used. Please note the Set Status Button cannot be used to make changes to a shipment in the CBSA system. eg. setting the status to Cancelled will not cancel a shipment with CBSA. A cancel request would be used instead.
Moving the mouse over this button displays the choice between all available statuses for an ACI eManifest. Once the selection is made the user will be asked to confirm the selection, and the Current Status will be updated.
Back to ACI eManifest Button
Used to return to the ACI eManifest Details Page of the manifest that the shipment is attached to. Typically used when the user has finished entering all the information for the shipment. Will only appear if the shipment is attached to a manifest.
Change Trip / Add Trip
Used to select which manifest the shipment is attached to. Will be displayed as Change Trip if the shipment is already attached to a manifest, or as Add Trip if the shipment is Unassociated. By typing the trip number of the desired manifest it will come up for the user to select. Clicking on it or pressing enter will attach the shipment to the selected manifest.
Please note that in order to select it, the desired manifest must already exist in BorderConnect. If the manifest still needs to be created it should first be done from the Start New ACI eManifest Page. If the manifest already exists but the trip number needs to be edited that should be done from the Edit ACI eManifest Page. This field cannot be used to create new manifests or change the trip numbers of existing manifests.

Details / History Window

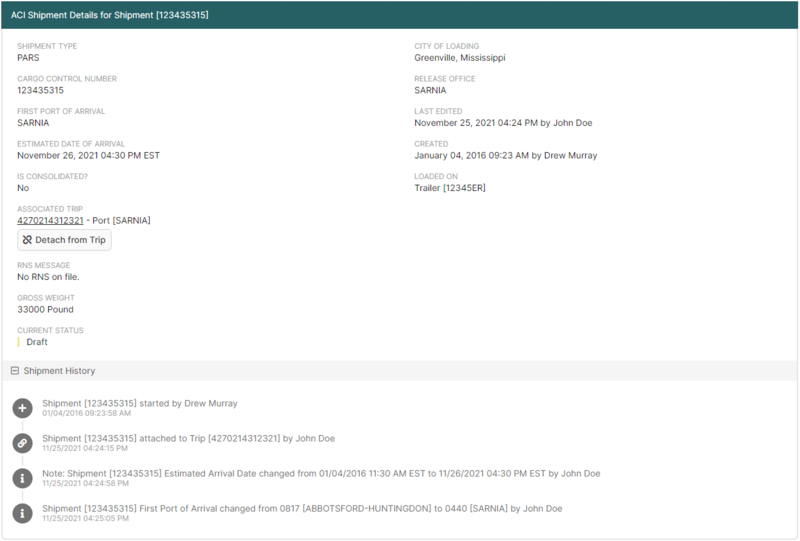
The Details/History Window is located directly under the Main Function Buttons. It is designed to give the user information about the status of the shipment. It is divided into two sections:

Details
Displays information about the shipment including the Cargo Number, Port of Arrival and Release Office, Estimated Arrival Date, Sublocation/Warehouse, RNS Messages associated with the shipment, Current Status and Associated Trip among other details.
History
Displays a complete history for the shipment, including when the shipment was started, major changes that were made, what was sent to CBSA, and CBSA responses. Together with Current Status, this section is crucial to understanding the state of the shipment.

Shipper, Consignee and Contacts Section

The Shipper, Consignee and Contacts Section is located directed below the Details/History Section. It allows the user to add a Shipper and Consignee to the shipment, and a 3rd Party if applicable. It can also be used to change or edit a Shipper, Consignee, or 3rd Party.

Create Shipper Button
Used to add a Shipper to the shipment. Should only be used if the Shipper has not be entered in BorderConnect before, otherwise Quick Assign Shipper should be used. Clicking on this button will bring the user to the Add New Shipper for ACI Shipment Page to enter the Shipper's name and address. Only the fields marked as required need to be completed. Once entered, clicking 'Save' will add the Shipper to the manifest and return the user to the ACI Shipment Details Page.
Create Consignee Button
Used to add a Consignee to the shipment. Should only be used if the Consignee has not be entered in BorderConnect before, otherwise Quick Assign Consignee should be used. Clicking on this button will bring the user to the Add New Consignee for ACI Shipment Page to enter the Consignee's name and address. Only the fields marked as required need to be completed. Once entered, clicking 'Save' will add the Consignee to the manifest and return the user to the ACI Shipment Details Page.
Add 3rd Party Button
Used to add either a Delivery Destination or Notify Party to the shipment. Moving the mouse over this button will allow the user to select between Delivery Destination and Notify Party, and bring the user to separate screen to enter the 3rd Party's name and address. Only the fields marked as required need to be completed. Once entered, clicking 'Save' will add the 3rd Party to the manifest and return the user to the ACI Shipment Details Page.
Quick Assign Shipper
Used to assign a Shipper to the shipment. Can only be used if the Shipper has already been entered in BorderConnect, otherwise the Assign Shipper Button must be used. By typing either the name or address of the Shipper it will come up for the user to select. Clicking on it or pressing enter will assign the Shipper to the shipment. Quick Assign Shipper will only be displayed when there is no Shipper on the shipment.
Quick Assign Consignee
Used to assign a Consignee to the shipment. Can only be used if the Consignee has already been entered in BorderConnect, otherwise the Assign Consigee Button must be used. By typing either the name or address of the Consignee it will come up for the user to select. Clicking on it or pressing enter will assign the Consignee to the shipment. Quick Assign Consignee will only be displayed when there is a Shipper but no Consignee on the shipment.
Edit
Used to edit the name or address of a Shipper, Consignee or 3rd Party. Should only be used to change an incorrect name or address; to change to a completely different Shipper, Consignee or 3rd Party the user should first use Remove from Shipment and then add the new one in. Clicking Edit will bring the user to a separate screen where the changes can be made. Once finished, clicking 'Save' will update the Shipper, Consignee or 3rd Party and return the user to the ACI Shipment Details Page.
Remove from Shipment
Used to remove a Shipper, Consignee or 3rd Party from the shipment.

Commodity Section

The Commodity Section is located at the bottom of the page directly below the Shipper, Consignee and Contacts Section. It allows the user to review and manage the commodity information for the shipment.

Create Commodity Button
Used to add a commodity to the shipment. Clicking this button brings the user to the Add/Edit Commodity for ACI Shipment Page to enter the commodity information. Once entered, clicking 'Save' will add the commodity to the shipment and return the user to the ACI Shipment Details Page.
Edit
Used to edit the information on an existing commodity. Clicking Edit will bring the user to the Add/Edit Commodity for ACI Shipment Page to allow the changes to be made. Once finsihed, clicking 'Save' will update the commodity and return the user to the ACI Shipment Details Page.
Delete
Used to remove a commodity from the shipment.