QP In-Bond Details for In-Bond Page (U.S. In-Bond Manager)
| This article is part of the BorderConnect Software User Guide |

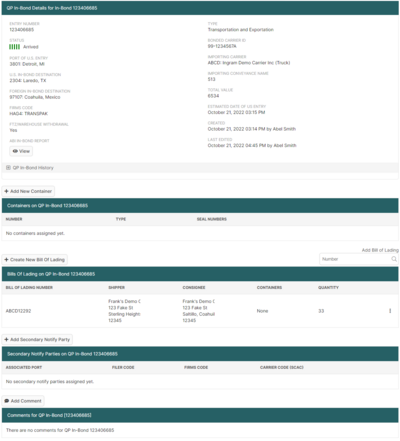
The QP In-Bond Details for In-Bond Page is a page in BorderConnect U.S. In-Bond Manager where the user can review the information entered for the QP In-Bond details. It gives a complete overview of all the information on the QP in-bond, as well as the ability to make changes to the QP in-bond, and to transmit it to CBP. This page should be referred back to whenever there is a need to review information on the QP in-bond, to verify the current status of the QP in-bond, or to make changes to the QP in-bond.
The QP In-Bond Details Page can be accessed in the following ways:
- This page will come up automatically upon saving a new QP In-Bond. (provided the 'Save and Create New Bill of Lading' option is not selected)
- By using the 'Back to QP In-Bond Details for In-Bond' button on the Start New QP Bill of Lading page.
- From the QP In-Bond Search Page by clicking 'View' on the QP In-Bond search result.
Main Function Buttons
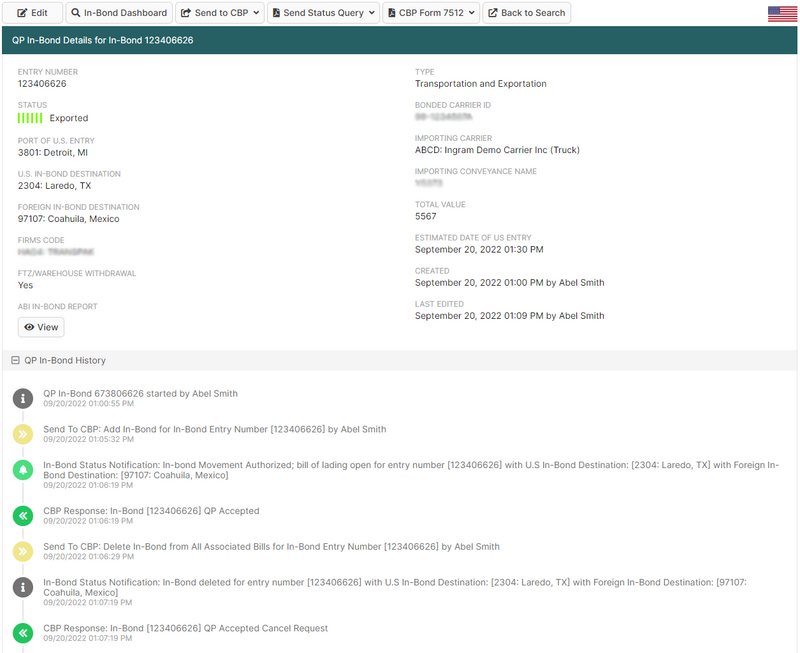
The main function buttons are located near the top of the page. They allow access to some of the most important functions on the QP in-bond, most of which would commonly by used only when the QP in-bond has been completed.
- Edit Button
- Used to change the all of the QP in-bond details, such as Entry Number, In-Bond Entry Type, U.S. Port of Entry, U.S. In-Bond Destination and any other fields associated to the QP In-Bond. It brings the user to the Start/Edit QP In-Bond Page to allow these changes to be made. Upon making the changes and clicking 'Save' the user is returned back to the QP In-Bond Details Page.
- In-Bond Dashboard
- Used to bring the user to the U.S. In-Bond dashboard, where the user can view all U.S. in-bonds in BorderConnect.

- Send to CBP Button
- Used to transmit QP In-Bond data to CBP. Moving the mouse over this button displays the following choices:
- Send QP In-Bond: Transmits the QP In-Bond to CBP. Should only be used for a QP in-bond not currently on file with CBP. (ie a unknown or cancelled status).
- Cancel QP In-Bond: Transmits a request to cancel the QP in-bond to CBP. Used when a QP in-bond that is already on file needs to be cancelled in order to allow changes to the entry number, bill of lading numbers or any other details associated to the QP in-bond, or simply because the freight is no longer expected to cross the border.
- Once the selection is made the user will be asked to confirm the transmission, and the request will be sent to CBP. If there were any errors on the QP in-bond to prevent the transmission, the user would be notified at this time.
- Send Status Query
- Used to send a status query to CBP for this QP in-bond. In approximately a minute CBP will respond, providing a response in the history section of the QP in-bond details page. This is recommended when gathering the current status of the in-bond in CBP's system.
- Moving the mouse over this button displays the choice between all available statuses for a QP in-bond. Once the selection is made the user will be asked to confirm the selection, and the Current Status will be updated.
- CBP Form 7512
- Used to generate a CBP form 7512 form. All of the information necessary on the CBP Form 7512 will be displayed from the data entered on the QP in-bond. Including the Entry Number, Type of In-Bond Entry, the Importer IRS Number, Commodity info, Total Value, HTS Code and more.
- Moving the mouse over this button displays the choice between printing, faxing or emailing the CBP Form 7512.
Details / History Window
The Details/History Window is located directly under the Main Function Buttons. It is designed to give the user information about the status of the QP in-bond. It is divided into two sections:
- Details
- Displays information about the QP in-bond, including the Entry Number, In-Bond Entry Type, Port of U.S. Entry, U.S. In-Bond Destination, the Importing Carrier, and the Current Status.
- QP In-Bond History
- Displays a complete history for the QP in-bond and all attached bills of lading, including when the QP in-bond and bills of lading were started, major changes that were made, what was sent to CBP, and CBP responses. Together with Current Status, this section is crucial to understanding the state of the QP in-bond. The History Section is the only place where the user can:
- The user can determine when the QP in-bond was accepted and on-file, was given authorization to move in-bond in the U.S. with an enroute status and determine if the in-bond should be arrived or exported, depending on the status. Please note that if the QP in-bond was cancelled and resubmitted, or if it was changed.
- See a CBP Reject. When Customs rejects a QP in-bond the reason for the reject will be displayed here, allowing the user to determine what action needs to be taken to correct it.
- Track changes made to the QP in-bond. While other areas of the system will display current information, the history will record major changes made to the QP in-bond, which could be crucial to understanding its progression.
Container Section
The Container Section is located directly below the Details/History Window. It displays which container is currently listed on the QP in-bond and allows the user several options to change it. Please note that it is not mandatory to report the container information on a QP in-bond, unless a container is used.
- Add New Container Button
- Used to select which container should be listed on the QP in-bond. Clicking on this button will bring the user to a screen where the container selection can be made, as well as the option to indicate the container number, selecting the container type, and adding any seal numbers associated to the container. Once the container is selected clicking 'Save' will assign the container to the QP in-bond and return the user to the QP In-Bond Details Page.
Bill of Lading Section
The Bills of Lading Section is located directly below the Container Section. It displays a list of Bills of Lading currently attached to the QP In-Bond and gives the user a detailed oversight and control of that list, including options to add or remove bills of lading, and access existing bills of lading for editing. Please note that it is mandatory to report all bills of lading included on a QP in-bond.
- Create New Bill of Lading Button
- Used to add a bill of lading to the QP in-bond. Clicking on this button will bring the user to the Start New QP Bill of Lading Page. Creating a bill of lading using this function will automatically attach the bill of lading to the QP in-bond. This option should only be used when the bill of lading has not yet been created in BorderConnect. For a bill of lading that is already created, the Add Bill of Lading should be used instead.
- Add Bill of Lading Field
- Only use this field if a bill of lading was previously entered in BorderConnect. Clicking on this field brings the user to a search listing recent Bills of Lading.
Add Secondary Notify Party Section
The Add Secondary Notify Party Section is located directly below the Bills of Lading Section. It displays a list of secondary notify parties for the QP in-bond. Please note that it is not mandatory to report all secondary notify parties.
- Add Secondary Notify Party Button
- Used to add a new secondary notify party to the QP in-bond. Can be used multiple times to add multiple secondary notify parties. Clicking on this button will bring the user to a screen where the secondary notify party selection can be made. On this page a user can assign an Associated Port, FIRMS Code, a Filer Code, and a SCAC code for the secondary notify party. Once the secondary notify party is created, clicking 'Save' will assign the secondary notify party and return the user to the QP In-Bond Details Page.
Comment Section
The Comment Section is located directly below the Add Secondary Notify Party Section at the very bottom of the page. It allows the user to add and view comments about the QP In-Bond. These comments are not transmitted to CBP; their purpose is for user reference only. It is highly recommended to add comments to the QP in-bond to record anything out of the ordinary as it is an excellent way to communicate the situation to other users and to retain information for audit purposes.
- Add Comment Button
- Used to add a comment to the QP in-bond. Clicking on this button will bring the user to a screen where the comment can by typed. Once finished, clicking 'Save' will add the comment to the QP in-bond and return the user to the QP In-Bond Details Page.
- Edit
- Used to edit an existing comment on the QP in-bond. It will bring the user to a screen where the comment can be edited. Once finished, clicking 'Save' will update the comment and return the user to the QP In-Bond Details Page.
- Delete
- Used to remove a comment from the QP in-bond.


