Add New Driver Page (ACE and ACI eManifest): Difference between revisions
Created page with "{{note|This article is part of the BorderConnect Software User Guide|info}} {{#ev:youtube|JRNan7CgZpI|360|right|A video tutorial on creating a driver profile within BorderConnect.}} <onlyinclude>The '''Add New Driver Page''' is a page in [https://borderconnect.com BorderConnect eManifest software] where the user enters the information to create a new Driver Profile. It can be accessed in the following ways: *From the Manage Data me..." |
No edit summary |
||
| (4 intermediate revisions by the same user not shown) | |||
| Line 1: | Line 1: | ||
{{note|This article is part of the [[BorderConnect_Software_User_Guide|BorderConnect Software User Guide]]|info}} | {{note|This article is part of the [[BorderConnect_Software_User_Guide|BorderConnect Software User Guide]]|info}} | ||
{{#ev:youtube|JRNan7CgZpI| | {{#ev:youtube|JRNan7CgZpI|960|center|A video tutorial on creating a driver profile within BorderConnect.}} | ||
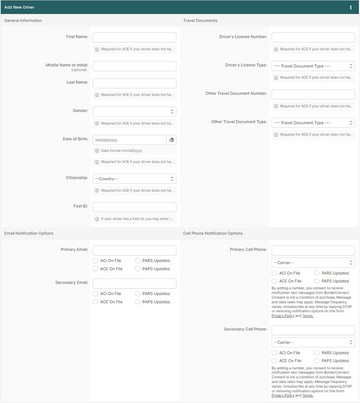
[[File:Adddriverpage1.png|360px|thumb|right|Viewing the '''Add New Driver''' page]]The '''Add New Driver Page''' is a page in [https://borderconnect.com BorderConnect eManifest software] where the user enters the information to create a new Driver Profile. It can be accessed in the following ways: | |||
*From the Manage Data menu by clicking 'Create Driver'. | *From the Manage Data menu by clicking 'Create Driver'. | ||
*From the [[Driver_Details_Page_(ACE_and_ACI_eManifest)|Driver Search Page]] by clicking the 'Create Driver' button. | *From the [[Driver_Details_Page_(ACE_and_ACI_eManifest)|Driver Search Page]] by clicking the 'Create Driver' button. | ||
*From the Add Driver/Crew for ACE eManifest Page by clicking the 'Create Driver' button. | *From the Add Driver/Crew for ACE eManifest Page by clicking the 'Create Driver' button. | ||
;Save Button | ;Save Button | ||
Latest revision as of 10:41, 2 June 2023
| This article is part of the BorderConnect Software User Guide |

The Add New Driver Page is a page in BorderConnect eManifest software where the user enters the information to create a new Driver Profile. It can be accessed in the following ways:
- From the Manage Data menu by clicking 'Create Driver'.
- From the Driver Search Page by clicking the 'Create Driver' button.
- From the Add Driver/Crew for ACE eManifest Page by clicking the 'Create Driver' button.
- Save Button
- Saves currently entered information to a new Driver Profile. Can only be used if all required fields have been filled out. Clicking on this button will create the Driver Profile and bring the user to the Driver Details Page.
- Cancel Button
- Cancels the attempt to create a new Driver Profile. Clicking on this button will disregard all entered data and bring the user to the Driver Search Page.
- Clear Button
- Clears all fields on the page so that the user may enter other data instead.
General Information
In this section of the page the user can enter the basic Driver Profile information. Please refer to the legend at the bottom of the page for guidance on which fields are required under what circumstances.
- Driver Number
- Unique number to identify the driver. Usually an employee number can be used if applicable. Otherwise driver's initials are also acceptable. This field is always required.
- First Name
- Driver's first name. This field is always required.
- Middle Name or Initial
- Driver's middle name or initial. This field is always optional.
- Last Name
- Driver's last name. This field is always required.
- Gender
- Driver's gender. Can be selected using the drop down menu. This field is required when the Driver Profile will be used on ACE eManifests and the driver does not have a FAST Card or ACE ID. Otherwise it is optional.
- Date of Birth
- Driver's date of birth. Can be entered in the text field in the format mm/dd/yyyy or using the calendar tool. This field is required when the Driver Profile will be used on ACE eManifests and the driver does not have a FAST Card or ACE ID. Otherwise it is optional.
- Citizenship
- Driver's citizenship. Can be selected using the drop down menu. If the driver is a dual citizen it is recommend to enter the citizenship that matches the documentation that will be presented at the border. This field is required when the Driver Profile will be used on ACE eManifests and the driver does not have a FAST Card or ACE ID. Otherwise it is optional.
- Terminal/Office
- The terminal or office that the driver should be assigned to. Can be selected from the terminals list using the drop down menu. This field is always required. Please note that if the desired terminal or office is not listed, more can be created from the Company Details Page by clicking the New Terminal button.
- ACE ID / FAST ID
- Used to indicate a driver's FAST ID or ACE ID. If a driver is FAST approved the FAST Card number (number starting with 4270) should be entered in the text field. Otherwise an ACE ID can optionally be entered here. If an ID has been entered in the text field, the type (ACE ID or FAST ID) must be selected using the drop down menu. This field is only required when the driver is FAST approved and the Driver Profile will be used on ACE eManifests.
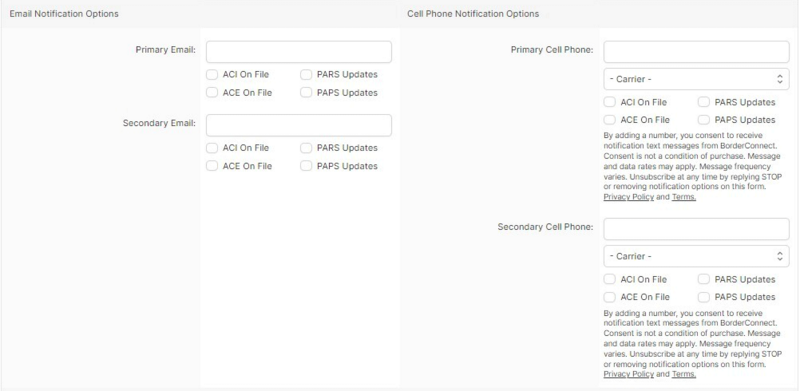
Notification Options
In this section of the page the user can specify options for the driver to be notified when their shipments have been cleared by the Customs Broker. The driver can receive ACI/PARS notifications or ACE notifications or both.
ACI/PARS notifications only work for customers subscribing to BorderConnect's PARS Checking software. The notification will be sent out when a PARS Shipment gets accepted on an ACI eManifest for the driver. It will also be sent if an accepted PARS falls within a PARS Sequence for that driver.
ACE notifications will be sent out when a PAPS or QP In-Bond shipment gets accepted on an ACE eManifest for the driver.
All fields in this section are optional.
- Primary Email
- Used to indicate an email address for the driver to receive notifications. The email address can be entered in the text field. The user should then select which type of notifications to send to the driver using the checkboxes for ACI/PARS notifications and ACE notifications.
- Secondary Email
- Used to indicate a second email address for the driver to receive additional notifications. As with the primary email, the email address can be entered in the text field. The user should then select which type of notifications to send to the driver using the checkboxes for ACI/PARS notifications and ACE notifications.
- Primary Cell Phone
- Used to indicate a cell phone for the driver to receive notifications by text via SMS. The cell phone number can be entered (must include area code) into the text field. The cell phone carrier must then be selected using the drop down menu. The user should then select which type of notifications to send to the driver using the checkboxes for ACI/PARS notifications and ACE notifications.
- Secondary Cell Phone
- Used to indicate a second cell phone for the driver to receive notifications by text via SMS. As with the primary cell phone, the cell phone number can be entered (must include area code) into the text field. The cell phone carrier must then be selected using the drop down menu. The user should then select which type of notifications to send to the driver using the checkboxes for ACI/PARS notifications and ACE notifications.

