Creating a Split Shipment (ACE Manifest): Difference between revisions
Created page with "{{note|This article is part of the BorderConnect ACE Manifest Guide|info}} {{#ev:youtube|bqWucvQIaeI|960|center|How to create master and split shipments using BorderConnect.}} A '''Split Shipment''' occurs when a single PAPS entry with a single PAPS number is being taken across the border at different times due to the size of the shipment. It is not the responsibility of the carrier to determine if a load they are taking is a..." |
(No difference)
|
Revision as of 13:37, 1 June 2023
| This article is part of the BorderConnect ACE Manifest Guide |
A Split Shipment occurs when a single PAPS entry with a single PAPS number is being taken across the border at different times due to the size of the shipment.
It is not the responsibility of the carrier to determine if a load they are taking is a split shipment. The customs broker or importer should inform the carrier when they are taking a load that is clearing under a split shipment.
The importer or customs broker will also have obtained special permission from the CBP port prior to set up the split shipment PAPS entry.
Enabling Split Shipments In Company Settings
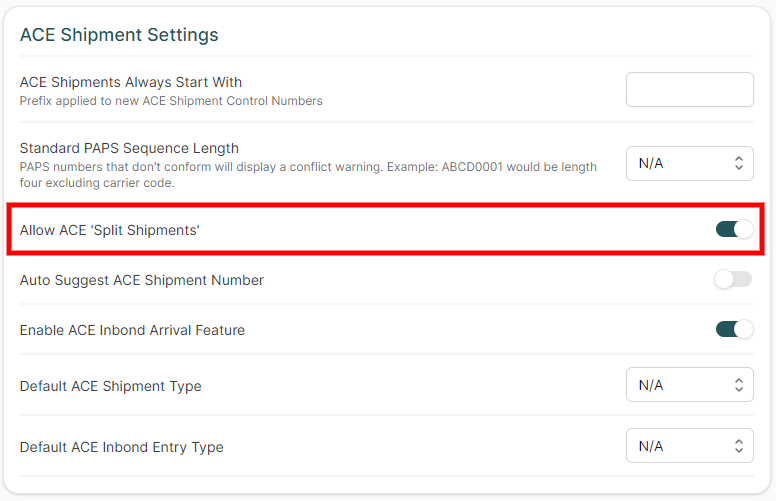
Before split shipments can be processed in BorderConnect ACE Manifest Software, you must first enable the option to do split shipments in the company preferences page. To do this, when logged in, navigate to Account and select the option Company Settings. Under the ACE Shipment Settings section, select "Yes" under the Allow ACE "Split Shipments". Then click the save button at the top.
Creating the Master Shipment
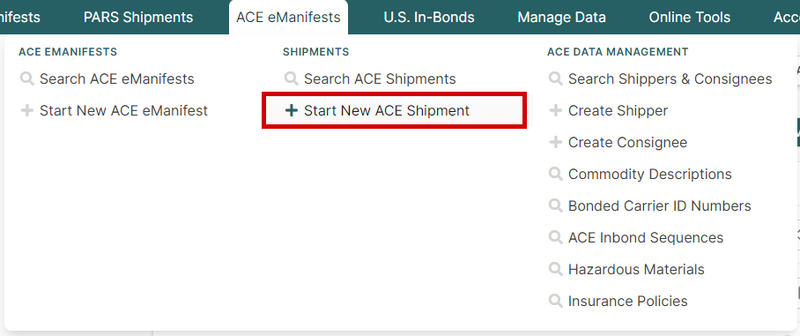
First, the carrier must create the master shipment. The master shipment will be the total for all of the split shipment segments. To create the master shipment, navigate to ACE eManifests and under the Shipments header, click Start New ACE Shipment (Not Start New ACE eManifest). Enter the Shipment Control Number. The shipment control number will be the PAPS number that the broker is using for the entry. Next, enter the shipper, consignee and then the commodity information. When entering the commodity information it is import that quantity represents the total quantity (total piece count for example) of the entire quantity of all shipments. Each load taken will be subtracted for the total of the master shipment, and when it reaches zero the master shipment will be acquitted and it will no longer be possible to take more loads under this PAPS number.
Next, push the Save button and navigate to the top of the ACE Shipment Details using BorderConnect ACE Manifest software page and hover over Shipment Only Send to CBP and select Send Unassociated Shipment. Once the shipment has been accepted by CBP the split shipment segments can then be created.
Creating Manifests For Split Shipments
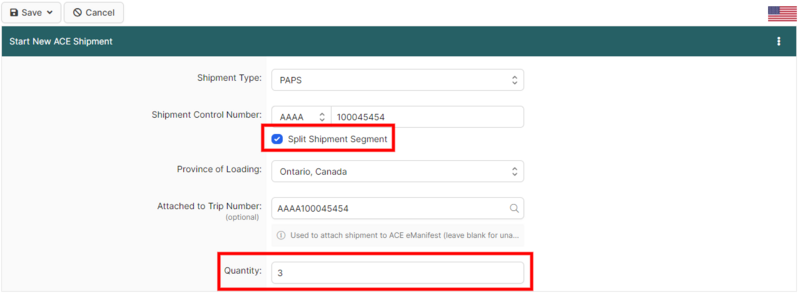
After the master shipment has been submitted and accepted in ACE by CBP, the carrier can then start creating the split shipments. To create a split shipment segment, navigate to the ACE eManifests menu option and click Start New ACE eManifest. Enter the ACE Manifest data such as a unique trip number, port, eta, and the truck, trailer and driver, then click Save and Start New ACE Shipment. Now enter the master shipment control number. (You must use the same shipment control number for all split shipment segments, and it must be the same shipment control number as the master shipment). Then click the checkbox Split Shipment Segment. The shipper, consignee fields can be left blank. You will then need to enter the quantity of this shipment segment in the Quantity box. The quantity of the split shipment segment must be the quantity that is physically on that load. (Each shipment segment quantity must be it's own individual quantity, and the total of all shipment segments must match the total of the master shipment). After you enter the shipment segment quantity you will not have to enter the commodity information as that information is on the master shipment originally submitted to CBP.
Once the split shipment information has been entered, click save, then Back to eManifest. Once you're back at the eManifest details page confirm that the shipment has a green light and it's set to a split shipment. Then navigate to the top of the eManifest details page and at the top of the page click Sync with CBP.
In approximately 30-60 seconds the eManifest with the split shipment segment should be accepted and it's status at three blue bars.
This process must be repeated for every split shipment segment until all of the shipment quantities are fulfilled. If the split shipment quantities do not total to the master shipment quantity your manifest will be rejected.
Master Shipment vs. Split Shipment Segment
| Master Shipment | Split Shipment |
|---|---|
| Created as "Unassociated Shipment" with no eManifest | Created as "Split Shipment" within eManifest |
| Created First | Created Second |
| Total Quantity | Partial Quantity |
| Uses Same Shipment Control Number | Uses Same Shipment Control Number |
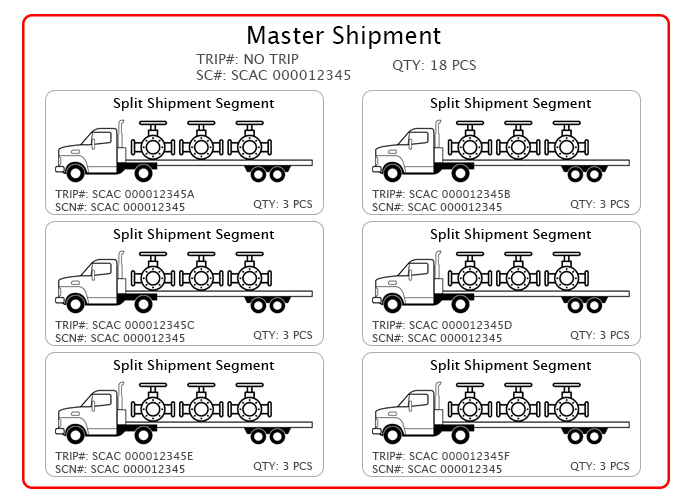
Below - A visual example showing the difference between the Master Shipment and the Split Shipment Segments.
Cancelling or Making A Change To A Master Shipment or Split Shipment
- Changing the quantity on a split shipment
- To change the quantity on a split shipment segment the user must first detach the shipment from the manifest. Once the shipment is detached from the manifest, navigate to the top of the eManifest details page and click 'Cancel eManifest'. Once the ACE Manifest is canceled, find the detached shipment. To attach the shipment back to the manifest navigate down on the eManifest details page and below the driver on the right-hand side of the page click into the box with a magnifying glass icon that says "Quick Assign Shipment". In that box start typing in the shipment control number. Once it brings up the previously detached shipment, click it to re-attach it. Once the shipment is attached, click edit under the Actions column to get into the shipment details. You can then change the quantity in the quantity box, then click Save.
Now navigate back to the ACE Manifest, by click 'Back to eManifest' at the top right of the shipment details page. Now you can send your eManifest back to CBP by clicking "Sync with CBP" at the top of the page.
- Removing a split shipment
- To remove a split shipment, you will need to detach the shipment from the manifest using the detach link on the right-hand side of the page. After the shipment is detached, click "Cancel eManifest" at the top of the eManifest details page.
- Changing Master Shipment Control Number
- To change the shipment control number of the Master shipment you will need to view the unassociated master shipment. To view unassociated ACE shipments in BorderConnect navigate to the ACE eManifests menu option at the top of the page. Then, click 'Search ACE Shipments'. Once on the Search ACE Shipments page you may see the shipment in the listing below. If you do not you can easily search for the Shipment Control Number. Once you locate the Master Shipment, click view. Once inside the shipment details page navigate to the top under 'Shipment Only Send to CBP' and select 'Cancel Shipment Message'.
After the Master Shipment has been canceled, all of the ACE Manifests containing the split shipment segments must also be canceled.
After the Master shipment and all split shipment segments have been canceled, you can then change the shipment control number. To do this, navigate back to the unassociated master shipment using the 'Search ACE eManifests' menu option. Once you're re-located the shipment, click edit. Then, change the shipment control number and click save and you will be brought back to the shipment details page. At the top of the shipment details page hover over 'Shipment Only Send to CBP' and click 'Send Unassociated Shipment'. Once the shipment is accepted by CBP the canceled ACE Manifests with the split shipment segments can then be changed to match the new shipment control number. You would then re-sync each ACE Manifest containing each shipment segment using the 'Sync with CBP' option at the top of the ACE eManifest Details page.


