Main Page: Difference between revisions
No edit summary |
No edit summary |
||
| Line 220: | Line 220: | ||
{{BorderPrintPromo}} | {{BorderPrintPromo}} | ||
<div class="bc-card" style="margin-top: 30px | <div class="bc-card" style="margin-top: 30px;"> | ||
< | <h2><i class="fas fa-file-invoice" style="margin-right: 10px;"></i> Featured: Assigning ACE In-Bond Info</h2> | ||
<div class="bc-subtle">Critical guide for managing in-bond shipments within the ACE eManifest system.</div> | |||
<div class="bc-screenshot-frame" style="float: left; margin: 0 25px 15px 0; width: 450px; max-width: 100%;"> | |||
[[Image:Aceinbond3.png|450px|left|link=ACE_In_Bond_(CBP_Shipment_Type)]] | |||
</div> | |||
<p style="font-size: 1.05rem; line-height: 1.6;"> | |||
Mastering the ACE In-Bond process is essential for carriers moving goods through the United States without paying duties. This guide breaks down the critical <strong>Assign In-Bond Information</strong> screen, showing you exactly how to configure the <strong>Entry Type</strong> (such as 61 IT or 62 T&E), manage paper in-bond numbers, and set the correct Foreign Destination to ensure full CBP compliance. | |||
</p> | |||
<p style="font-size: 1.05rem; line-height: 1.6;"> | |||
When creating an ACE Shipment that requires in-bond information, this screen allows you to add the necessary <strong>Entry Number</strong> and <strong>Foreign Destination</strong> data required for a successful transmission. Understanding these fields prevents rejected manifests and ensures your goods move seamlessly across the border under customs control. | |||
</p> | |||
<div style="clear: both; padding-top: 15px;"> | |||
[[ACE_In_Bond_(CBP_Shipment_Type)|<span class="bc-cta-button">Read Full Guide →</span>]] | |||
</div> | </div> | ||
</div> | </div> | ||
Revision as of 17:29, 11 February 2026
How can we help you?
Search the BorderConnect Knowledge Base or browse the guides below.
New to BorderConnect?
Step 1: Onboarding Readiness Guide
Step 2: Registering Register Account
Step 3: The Basics Software User Guide
Step 4: First ACI Create ACI Manifest
Step 5: First ACE Create ACE Manifest
Common Tasks
Video Tutorials
ACI eManifest Guide
- Creating and Submitting ACI
- Troubleshoot Rejections
- Creating In-Bond (Canada)
- Shipment Types (PARS, etc.)
- CBSA Port Codes
Did you know?
An ACI Lead Sheet is required for every entry. BorderConnect can auto-generate these for you.
ACE Manifest Guide
- Creating and Submitting ACE
- Troubleshoot Rejections
- Creating In-Bond (USA)
- Shipment Types (PAPS, etc.)
- CBP Port Codes
Did you know?
Insurance Policies are mandatory if you are hauling hazardous goods into the U.S.
U.S. In-Bond Manager
Did you know?
If a driver needs to change destinations after arriving in the U.S., you must file a Port Diversion rather than canceling the bond.
Advanced Tools
Did you know?
BorderConnect RNS-PARS can automatically send text messages or emails to your drivers the exact moment their shipment is released by CBSA.
Featured: Assigning ACE In-Bond Info
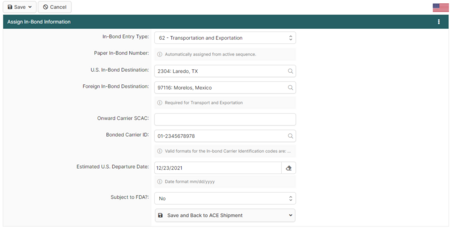
Mastering the ACE In-Bond process is essential for carriers moving goods through the United States without paying duties. This guide breaks down the critical Assign In-Bond Information screen, showing you exactly how to configure the Entry Type (such as 61 IT or 62 T&E), manage paper in-bond numbers, and set the correct Foreign Destination to ensure full CBP compliance.
When creating an ACE Shipment that requires in-bond information, this screen allows you to add the necessary Entry Number and Foreign Destination data required for a successful transmission. Understanding these fields prevents rejected manifests and ensures your goods move seamlessly across the border under customs control.