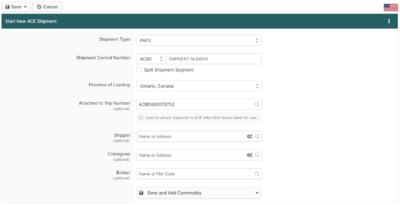
Start New ACE Shipment Page (ACE Manifest): Difference between revisions
(Created page with "{{note|This article is part of the BorderConnect Software User Guide|info}} 400px|thumb|right|Viewing the '''Start New ACE Shipment''' page{{#ev:youtube|kmCFG7LX2gU|360|right|How to add shipment info on an ACE eManifest in BorderConnect.}}'''The Start New ACE Shipment Page''' is a page in BorderConnect [https://www.borderconnect.com/ace-e-manifest/index.htm ACE Manifest software] where the user begins a new shipme...") |
(No difference)
|
Revision as of 15:48, 2 June 2023
| This article is part of the BorderConnect Software User Guide |

The Start New ACE Shipment Page is a page in BorderConnect ACE Manifest software where the user begins a new shipment. It allows the user to enter the main information for the shipment and save it once finished. The Start New ACE Shipment Page is normally accessed from the ACE Manifest Details Page by clicking the Create New Shipment Button, or by using the 'Save and Start New ACE Shipment' link on the Start New ACE Manifest Page. In both of those cases the new shipment will be added to the manifest be default. It is also possible to access the page under the ACE eManifests menu by selecting 'Start New ACE Shipment', although this will not automatically attach the shipment to a manifest.
- Save Button
- Used to save the data that has been entered on the page. Can only be used when the shipment control number has been filled in. Hovering on this button will reveal four options. Save and View Trip Details will save the shipment data entered and bring the user back to the eManifest details page. Save and Add Commodity will save the shipment data and bring the user to the Add Commodity for shipment page. Save and Add New Shipper will save the shipment data and bring the user to the Add Shipper page. Save and Add New Consignee will save the shipment data and bring the user to the Add Consignee page.
- Cancel Button
- Cancels the attempt to start a new ACE Shipment. Clicking on this button will disregard any data entered on the page and bring the user to the ACE Manifest Details Page or the ACE Shipment Search Page, depending on whether the shipment was started from a manifest or not.
- Shipment Type
- Used to indicate the type of Customs clearance for the shipment. It will automatically default to PAPS. If this is not correct the user can select the correct Shipment Type from the list using the drop down menu.
- Shipment Control Number
- This is a unique number to identify the shipment for CBP. Regardless of the Shipment Type a unique Shipment Control Number must be supplied. For PAPS shipments this will be the PAPS Number. The Shipment Control Number always begins with a SCAC, which can be selected using the drop down menu. This must be followed by at least 4 characters (numbers or letters) which can be entered in the text field.
- Province of Loading
- Used to indicate the province the goods were shipped from. Should match the province listed under the Shipper's address on the paperwork. The province of loading will default to the last one used on an ACE shipment, and can be changed using the drop down menu.
- Attached to Trip Number
- Used to indicate which manifest the shipment will be attached to. Will automatically be filled in if the shipment was started from manifest. Otherwise the manifest can be selected by typing the trip number in the text field and selecting it when it comes up. Please note the manifest being selected must already exist. This field can also be left blank to create an Unassociated Shipment.
- Quick Assign Shipper
- Used to select the Shipper for the shipment. Can only be used for existing shippers, it is not possible to enter a new one here. By typing either the name or street address of the shipper it should come up to be selected. Although this field is optional it is easiest to enter the shipper here if the shipper is already in the system, since it will be required for the manifest.
- Quick Assign Consignee
- Used to select the Consignee for the shipment. Can only be used for existing consignees, it is not possible to enter a new one here. By typing either the name or street address of the consignee it should come up to be selected. Although this field is optional it is easiest to enter the consignee here if the consignee is already in the system.
- Quick Assign Broker
- Used to indicate the Customs Broker for the shipment. This field is completely optional. If filled in it will allow the broker to view the ACE Shipment, provided they use the Broker Download feature in ACE. It will not impact receiving entry numbers on a manifest. By typing either the broker's name or filer code, it should come up to be selected.
- Save and Commodity
- Saves the information currently entered on the page and brings the user to the Add/Edit Commodity for ACE Shipment Page. Moving the mouse over this link will display additional options as well.
