Creating and Maintaining Truck Profiles (ACE and ACI eManifest)
| This article is part of the BorderConnect Software User Guide |
This guide offers instructions on creating and maintaining truck profiles. It assumes that you have an active software subscription with BorderConnect. If you are not presently set up with an account, please contact BorderConnect to get you set up.
Truck profiles are used in BorderConnect to complete mandatory information fields for ACE Manifests and ACI eManifests.
Once entered, the information in truck profiles remains saved in BorderConnect. There is no need re-enter the information each time a truck crosses on an ACE Manifest, for example. You would simply select the truck for the manifest and the information would be loaded automatically.
Creating a New Truck Profile
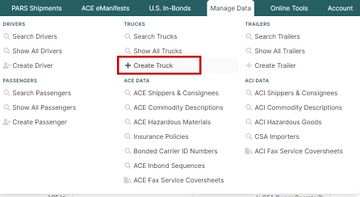
To begin creating a new truck profile, select the option 'Create Truck' under the Manage Data menu.
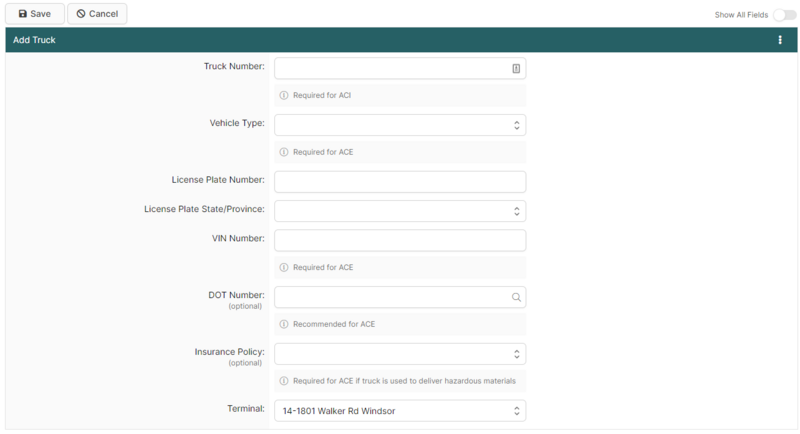
This will bring you to the Add Truck Page, where all of the information for the truck can be entered.
Please note that the legend at the bottom of this page will help indicate which fields are required for which purposes. For example if your truck profile will not be used for ACE eManifests only the fields Truck Number, License Plate Number and License Plate State/Province are required. Please note though that it's best to enter all information if you believe the truck profile may be used for ACE eManifests in the future. This will prevent having to return and enter the additional information later.
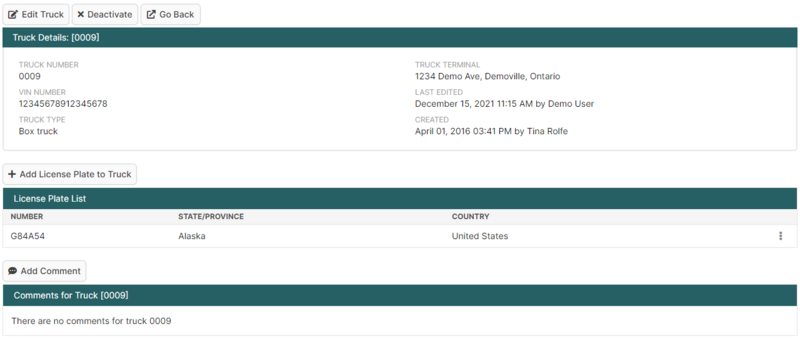
Once you have finished entering the information on the page, click the Save button at the top left. This will bring you to the Truck Details Page, which displays an overview of the truck profile.
Entering License Plates for Truck Profiles
Although you were given the option to add the license plate on the previous screen, if you did not do so you can add it here using the Add License Plate to Truck button. You can also add additional license plates to the truck by clicking this button again, but this is not recommended because it would not be compatible with ACE and ACI eManifest requirements. Only one license plate is allowed for use on manifests.
Maintaining Existing Truck Profiles
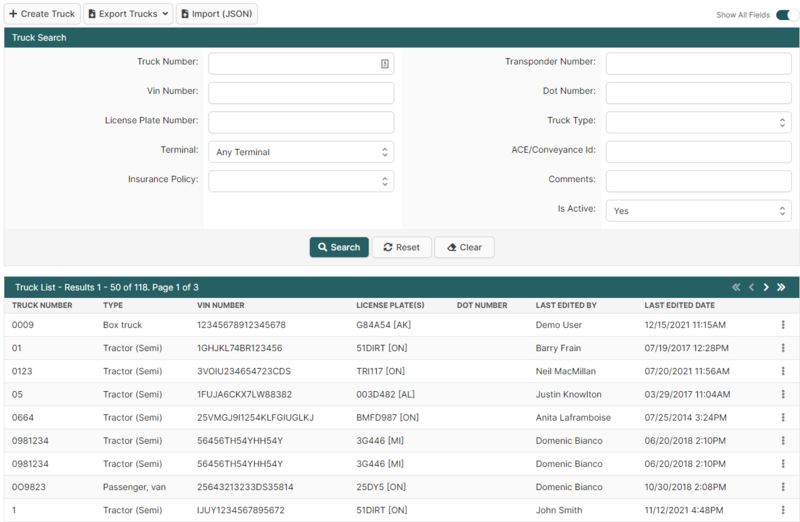
To manage your existing truck profiles, bring up the Truck Search Page by selecting 'Search Trucks' from the Manage Data menu.
By default this page will display a list of all truck profiles for your account, so right away it can be handy if you are looking to check which trucks you have already entered. Using the search options can also be useful for this if you are checking on a particular list of trucks.
If you want to update or view an existing truck profile, you can access it from here by finding the truck you want and clicking View. This will bring you to the Truck Details Page for that truck. The search options are also useful for narrowing it down to the truck you are looking for if you have a lot of truck profiles on your account.
If you want to delete an existing truck profile, this can be done by finding the truck you want and clicking Delete.


