Creating and Maintaining Driver Profiles (ACE and ACI eManifest)
| This article is part of the BorderConnect Software User Guide |

This guide offers instructions on creating and maintaining driver profiles. It assumes that you have an active software subscription with BorderConnect. If you are not presently set up with an account, please contact BorderConnect to get you set up.
Driver profiles are used in BorderConnect for 3 main purposes:
- To complete mandatory information fields for ACE Manifests.
- To indicate the driver for user reference or automatic notifications for ACI eManifests.
- To indicate the driver for user reference or automatic notifications for BorderConnect's PARS Checking Software.
Once entered, the information in driver profiles remain saved in BorderConnect. There is no need re-enter the information each time a driver crosses on an ACE eManifest, for example. You would simply select the driver for the manifest and their information would be loaded automatically.
Creating a New Driver Profile
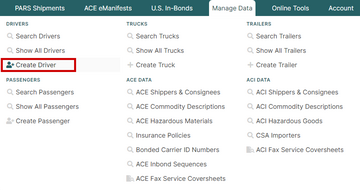
To begin creating a new driver profile, select the option 'Create Driver' under the Manage Data menu.
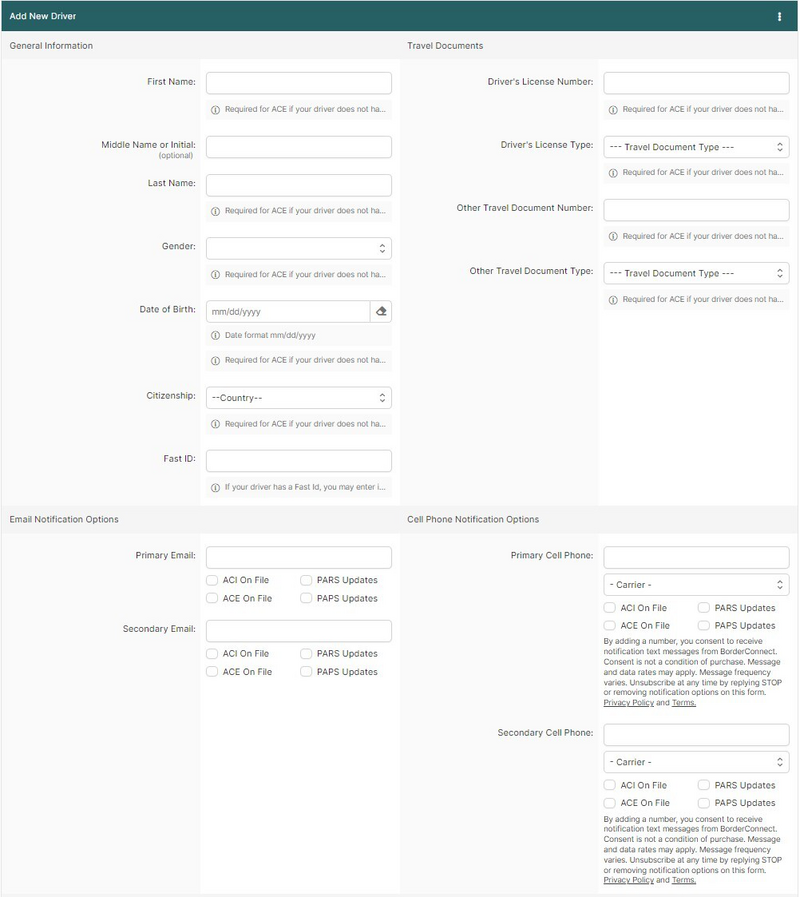
This will bring you to the Add New Driver Page, where the primary information for the driver can be entered, as well as the notification options if you wish for your driver to receive automatic notifications.
Please note that the legend at the bottom of this page will help indicate which fields are required for which purposes. For example if your driver profile will not be used for ACE eManifests only the fields Driver Number, First Name and Last Name are required. Please note though that it's best to enter all information if you believe the driver profile may be used for ACE eManifests in the future. This will prevent having to return and enter the additional information later.
If you will be using this profile for ACE eManifests and your driver has a FAST card, it is important to enter it on this page under ACE ID / FAST ID. FAST drivers are expected to be reported in ACE in this manner.
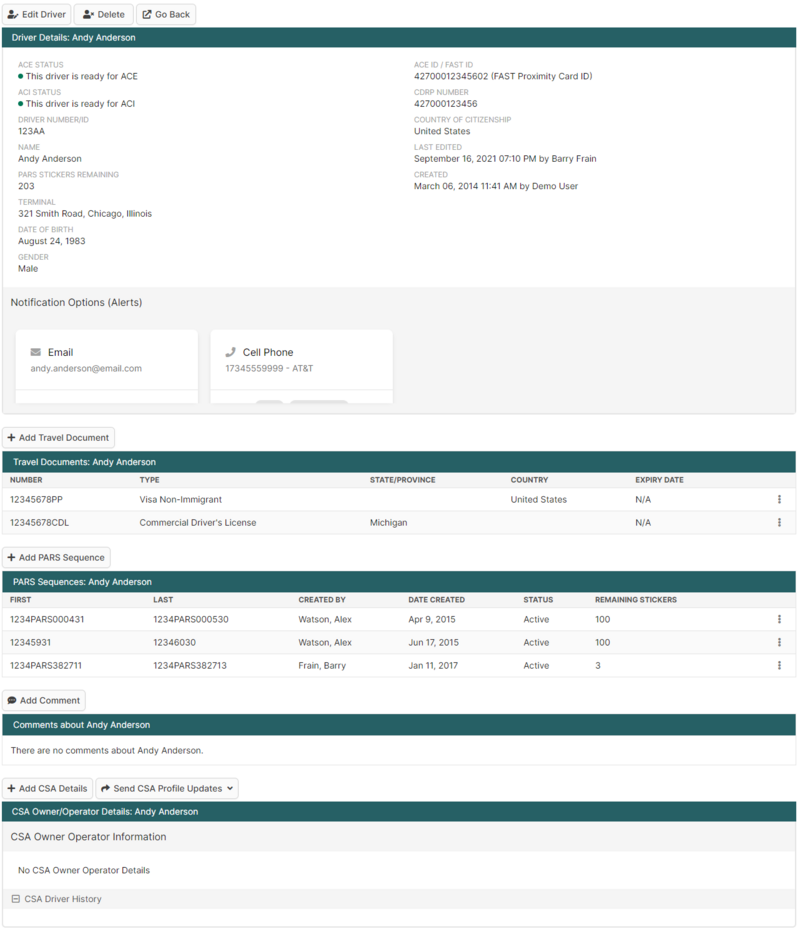
Once you have finished entering the information on the page, click the Save button at the top left. This will bring you to the Driver Details Page, which displays an overview of the driver profile.
Entering Travel Documents for Profiles used on ACE eManifests
If your driver profile will be used for ACE eManifests, and you have not entered a FAST card or ACE ID, your next step will be to enter travel documents. Non-FAST drivers will require 2 travel documents to be entered on their driver profile, including one Commercial Driver's License and one additional Travel Document.
To begin click on the Add Travel Document button and enter the information for the Commercial Driver's License. Once finished, click save to return to the Driver Details Page. You can then click Add Travel Document again to add the additional document. The second document you add should satisfy the driver's WHTI requirements, i.e. passport or equivalent, that are required for entering the United States at land border crossings.
For drivers with an Enhanced Driver's License, the proper way to enter it is to put it in as two separate travel documents: one as Commercial Driver's License and one as Enhanced Driver's License.
Entering PARS Sequences and RMD Sequences for Profiles used with PARS Checking
If your driver profile will be used for reference or notification with BorderConnect's PARS Checking software, but not with BorderConnect's ACI eManifest software, then you want to enter PARS and RMD Sequences on the driver profile. Having the sequences entered ahead of time allows BorderConnect to automatically know which driver a PARS or RMD belongs to when a new message comes in from CBSA. The message will then be marked with that driver's name in the PARS Shipments listings in BorderConnect, and can also be forwarded on to the driver if the notification options have been set.
To enter a PARS sequence, click the Add PARS Sequence button. You can then indicate a set of PARS numbers that you've assigned to your driver and click Save to add it to your driver profile. All PARS sequences assigned to your driver will be listed here, including how many PARS stickers remain, and options to manage the list will be included.
RMD sequences are added and managed in much the same way, by clicking the Add RMD Sequence button.
Entering CSA Details for TCP Profiles
The CSA Details on a driver profile are only used when your company is transmitting CSA Shipments in ACI using BorderConnect. They should only be entered by the person in your company that maintains TCP lists as part of your CSA requirements. For training and support on entering this information, that person should contact BorderConnect directly.
Maintaining Existing Driver Profiles
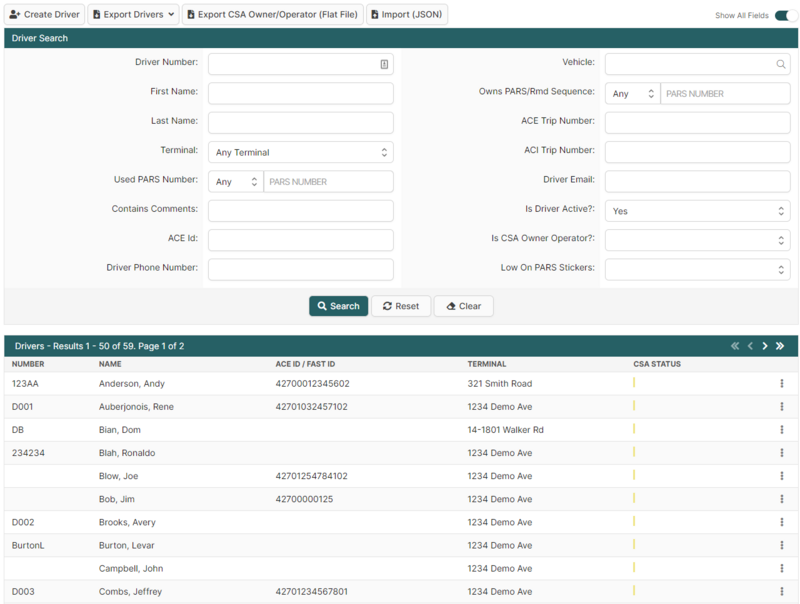
To manage your existing driver profiles, bring up the Driver Search Page by selecting 'Search Drivers' from the Manage Data menu.
By default this page will display a list of all driver profiles for your account, so right away it can be handy if you are looking to check which drivers you have already entered. Using the search options can also be useful for this if you are checking on a particular list of drivers.
If you want to update or view an existing driver profile, you can access it from here by finding the driver you want and clicking View. This will bring you to the Driver Details Page for the driver. The search options are also useful for narrowing it down to the driver you are looking for if you have a lot of driver profiles on your account.
If you want to delete an existing driver profile, this can be done by finding the driver you want and clicking Delete.
If you want to restore (recover from deleting) a driver profile you had previously deleted by first making sure "Is Driver Active" is set to "No" on your search options, then searching for the driver. Once found, clicking Activate will restore the driver profile.


